How to optimize images for WordPress

Over a billion websites, spanning hundreds of millions of servers worldwide, have one thing in common: images. The internet is a highly visual place, and while video content gets all the buzz these days, it’s still images and graphics that occupy most of the real estate on our screens. It’s essential to understand how to optimize images for WordPress to help your site perform at its best.
Optimizing images is one of the easiest ways to make your WordPress site faster, improve SEO, and create a better experience for your visitors. Here’s how you can get your images web-ready without losing quality or accessibility.
Introduction to image optimization
Image optimization is the process of adjusting an image’s dimensions and file size while maintaining quality, making it look great and load faster on web pages. This helps maximize the experience of every user who visits your site, no matter the size and shape of their device screen. Part of this process also involves paying attention to the type of graphics file being used and the purpose of the image once it is uploaded to your website.
Search engines favor fast-loading sites, so optimized images can also help you rank higher in search results, in comparison to slower, unoptimized WordPress sites. Plus, people simply prefer fast-loading pictures and are more likely to stay on a site longer if they don’t have to wait for visual resources to load.
Understanding image quality
Image quality refers to the level of detail and clarity in an image. High-quality images have a higher resolution and more detailed textures, while low-quality images appear pixelated and lack detail. When optimizing images, it’s essential to balance image quality with file size to ensure that the images load quickly without compromising their appearance.
For instance, photos can often be compressed more aggressively without noticeable quality loss, while graphics and images with text may require higher quality settings to preserve detail.
Image optimization techniques for WordPress
Several techniques can be used to reduce file size and improve website performance.
- Compressing images – You can use an image compression plugin or image editing software to reduce the file size of your images. Some WordPress plugins can automatically compress images as you upload them, making the process effortless.
- Resizing images – It’s essential to ensure your images are the appropriate dimensions for their intended use on the web.
- Converting images – Converting images to optimized file formats such as WebP or AVIF is another technique. These formats offer excellent compression rates without significant loss of quality.
- Using lazy loading – Lazy loading delays the loading of images until they are needed, such as after a user has scrolled further down a page. This can significantly improve initial page load times, especially when video content appears on the page.
- Removing unnecessary metadata – A more advanced practice is to strip out any unnecessary metadata and comments from your image files. This can be done using image editing software or optimization plugins.
Choose an image optimization plugin
One of the most effective ways to optimize images in WordPress is by using a dedicated image optimization plugin. ShortPixel stands out as a top choice for both beginners and advanced users, offering a comprehensive set of features to automate and streamline image optimization.
This plugin optimizes images and PDFs with a single click, supports bulk compression, and can convert images to next-generation formats like WebP and AVIF for faster loading times. It also includes lazy loading options, automatic resizing to your theme’s specifications, and a few other optional features.
ShortPixel is compatible with all major page builders, themes, and plugins, making it suitable for everything from small blogs to large WooCommerce stores.
Smush is another highly regarded image optimization plugin. Like other plugins, it automatically compresses images on upload, offers unlimited free image compression, and includes lazy loading to defer offscreen images for improved performance.
Image compression – finding the right balance
We definitely recommend image compression for all WordPress users, but there are some crucial factors to consider before you start.

Pros of compression
- Faster load times – smaller files make pages load quicker, improving user experience (UX) and SEO. Having images optimized for speed significantly impacts loading speed, ensuring quicker page loads and better search engine rankings.
- Reduced bandwidth and storage – saves cloud hosting resources and can lower costs.
- Improved mobile experience – faster loading is especially important for users on slower connections.
Cons of compression
- Possible quality loss – over-compression can make images look blurry or pixelated, especially with lossy formats like JPEG. It’s crucial to preserve original images during compression to ensure that you can revert to the uncompressed version if needed.
- Lost detail – fine details in graphics or text may disappear if compression is too aggressive.
How to find the right balance
- Use an image optimizer plugin that allows you to adjust compression levels and preview the results.
- For photos, moderate lossy compression is usually sufficient; for graphics or images with text, use lossless compression or higher-quality settings.
- Test your site’s speed with tools like Google PageSpeed Insights and adjust compression as needed. Evaluating performance metrics is crucial to ensure that the compression settings are effectively enhancing your site’s performance.
Image sizes for mobile and desktop compared
Choosing the right image size is key to balancing quality and performance. Here are some recommended sizes for common uses.
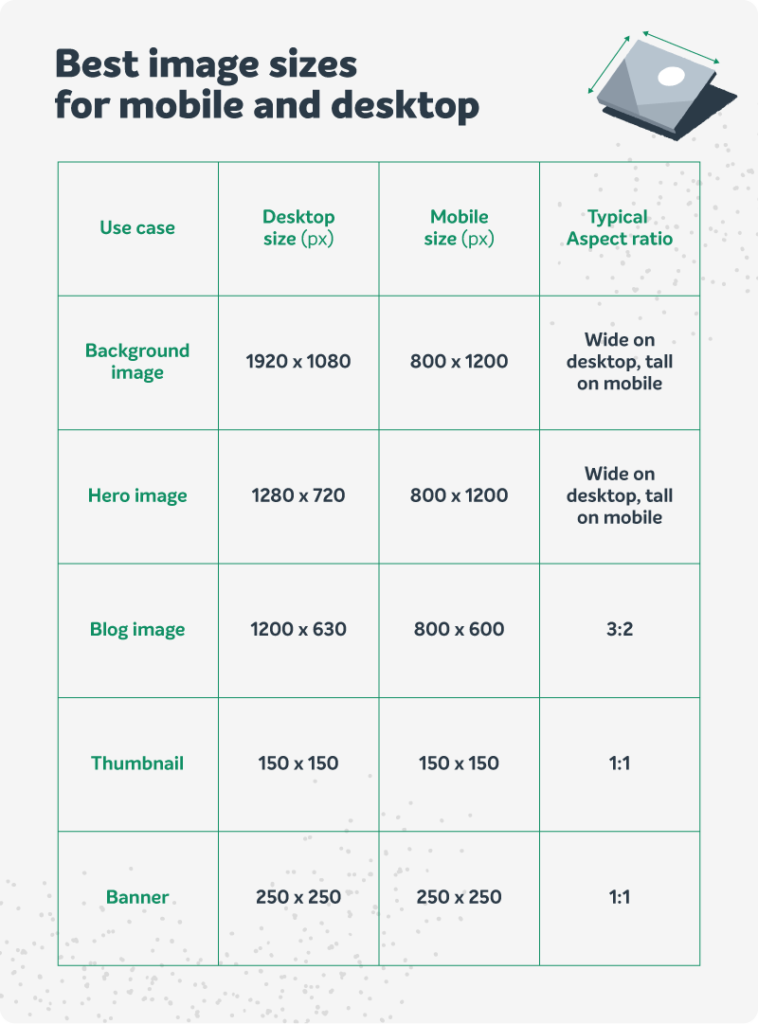
Every site is different, so use these recommendations as a starting point, but also review the images live on your website. Always resize images to the maximum size they’ll display on your site—don’t upload huge originals if they’ll only be shown as thumbnails. In some cases, you’ll need different graphics for wide vs. tall screens, and in other cases, you won’t.
Free image editing software for beginners
You don’t need expensive software to resize, crop, or tweak your images before uploading. Here are three free options:
- GIMP – a powerful, open-source editor with advanced features for retouching, resizing, and exporting in various formats.
- Fotor – a user-friendly online tool for quick edits like cropping, resizing, and enhancing, perfect for beginners.
- Canva – the free version offers a wide range of editing tools, including filters and drop-in elements like stickers and text.
Image file type pros and cons
Choosing the right image formats, such as JPEG, PNG, or GIF, is essential for optimizing website performance and loading speeds. Using next-gen formats like WebP can also enhance image quality while reducing file size, which is crucial for both WordPress SEO and user experience.
| Format | Pros | Cons | Best use |
| JPG/JPEG | small file size, great for photos, widely supported | lossy compression (quality loss), no transparency | blog photos, hero images. Optimizing jpeg files is crucial for maintaining quality while reducing file size. |
| PNG | lossless compression, supports transparency | larger file size than JPG | logos, graphics, images with text or transparency. Compressing png images can significantly improve website speed and performance. |
| GIF | supports simple animation, small file size for basic graphics | limited color palette, not suitable for photos | simple animations, icons |
| WebP | both lossy and lossless, smaller files than JPG/PNG, supports transparency and animation | not supported by older browsers | modern web images, when browser support is sufficient |
One common file type that should often be avoided is SVG. While SVG files are lightweight and very flexible in terms of scaling size, many search engines and apps will not use SVG images in page previews or auto-generated thumbnails. Therefore, it’s essential to have at least one JPG or PNG image file assigned to every page to ensure a better user experience when the page is shared.
Quick tips on picking the best image file type
- Use JPG for photos and large images.
- Use PNG for graphics, illustrations, logos, and images needing transparency.
- Use GIF for simple animations.
- Use WebP if your audience uses modern browsers—it offers the smallest file sizes with good quality.
Optimize your images to maximize your site
Optimizing images is about finding the right balance between quality, speed, and user experience. Proper image optimization can significantly enhance user experience by improving loading speed and saving storage space. By following this guide, your WordPress site will look great and load fast—no matter what device your visitors use.
For more ways to create an engaging WordPress site, check out our list of the best design tips. This guide will help you improve your brand story and connect with new users.
More articles from us!
How to create a WordPress gallery in minutes
How do I edit the footer in WordPress: 3 easy ways
