How to make a WordPress site private


The launch of a new website often gives way to the process of getting as many visitors to the site as possible. But in some cases, making your WordPress website private is part of the plan, from protecting sensitive information to building an exclusive community.
This guide will explain why you might want to make your site private, some significant risks to consider, and some beginner-friendly methods for keeping your WordPress content under wraps.
Why make your WordPress site private?
The internet has been called the “information superhighway,” but sometimes you must put on the brakes. There are several reasons content creators might consider making a website private.
- Personal use – You might want to use your site as a personal journal or a family-only sharing platform. Making a WordPress blog private ensures that only selected individuals can access your content.
- Development – If your site isn’t finished, keeping it private prevents visitors from seeing incomplete content. This privacy helps avoid a poor user experience caused by an incomplete website. You can make the whole site private to restrict access during development.
- Exclusive access – For clubs, educational groups, or businesses, restricting access ensures only authorized users or paying subscribers see specific content.
- Confidential projects – Work portfolios, internal company resources, or collaborative projects may require privacy.

Risks and limitations of a fully private website
One of the significant benefits of putting content online is having it passively discovered by your target audience. With a private website, the strategy is very different. While privacy brings control, it also introduces some trade-offs.
- No search engine visibility – A fully private site won’t be indexed by Google or other search engines, so that it won’t appear in search results. This limitation means you’ll miss out on organic traffic and potential new visitors.
- Limited sharing – Only users with access credentials can view your content, which can hinder sharing and growth.
- User experience – Extra steps (like logging in or entering passwords) can deter casual visitors from signing up for your site, even if they are interested in your content.
- Maintenance – Managing user permissions and troubleshooting access issues can add complexity, especially for paid users who might ask for a refund.
All this being said, a private, or partially private, website can be helpful and even critical for some website owners. Let’s look at a few simple ways to make this happen on your site.
1. Password protect your entire site
The simplest way to make your WordPress site private is to make visitors enter a password when they arrive. Additionally, you can opt for password protection only for specific pages and posts while keeping general access to your homepage public.
How to enable front-end password protection
- Log in to your WordPress dashboard.
- Go to Plugins > Add New.
- Search for a plugin like Password Protected or PPWP – Password Protect Pages.
- Install and activate the plugin.
- Go to Settings > Password Protected (or the plugin’s settings page).
- Enable password protection and set your desired password. You can also select privacy options like ‘Private’ or ‘Password protected’ from a dropdown menu.
- For additional privacy, you can modify your theme functions. Access the Theme File Editor and edit the functions.php file to add a code snippet restricting site access to logged-in users.
- Save your changes.
Result: Anyone visiting your site will see a password prompt. Only those with the password can access your content.
2. Require a subscription for premium content
When you want to restrict access to certain content like premium articles, courses, or downloads, and monetize your site, a membership website plugin is the way to go. These plugins make it easy to control access to specific parts of your WordPress site, while allowing complete, free, public access to others. They also help you grant members access to specific content by setting appropriate roles, ensuring only authorized users can view restricted content.
How to enable a subscription-based website
- Choose a membership plugin. Popular options include MemberPress and Ultimate Member.
- Install and activate your chosen plugin from the Plugins > Add New menu.
- Configure the plugin:
- Go to the plugin’s settings page (e.g., Ultimate Member > Settings).
- Create membership levels (e.g., Free, Premium, VIP) and set pricing if applicable.
- Restrict content:
- Use the plugin’s tools to specify which pages, posts, or categories are for members only.
- Non-members will see a login or signup prompt when accessing restricted content.
- Add registration and login forms to your site (often via widgets or shortcodes).
- Test your site to ensure only members can access premium content.
- If you used a code snippet to make your site private, you can return to the same dashboard to remove the code when you want to make the site public again.
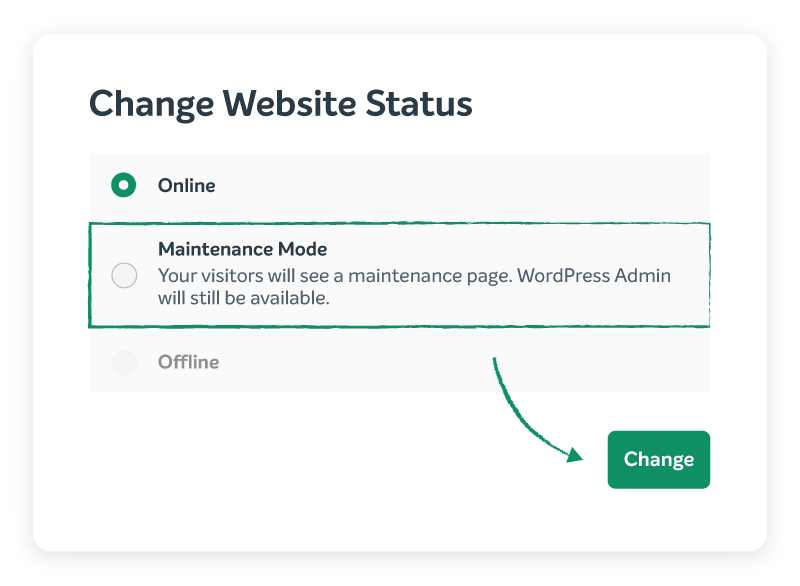
3. Maintenance mode for site updates
Maintenance mode is a feature that allows you to temporarily restrict access to your WordPress site while you perform updates, maintenance, or other tasks. This mode can be used to prevent visitors from accessing your site while you are making changes, and it can also be used to display a custom message or page to visitors.
How to enable maintenance mode
- Install and activate a maintenance mode plugin.
- Configure the plugin settings to customize the maintenance mode page.
- Enable maintenance mode to restrict access to your site.
EasyWP hosting users can skip this step and use our built-in maintenance mode functionality. From the EasyWP dashboard, you can simply go to your website status, click change, and pick “Maintenance Mode.”
4. Hide your site from search engines
Sometimes you want your WordPress site or a specific page easily accessible without a password, but not discoverable through Google, Bing, or other search engines. This approach is ideal if you share sensitive news, internal information, or emotionally triggering content and only want people with the direct link to find it, rather than anyone stumbling across it in search results.
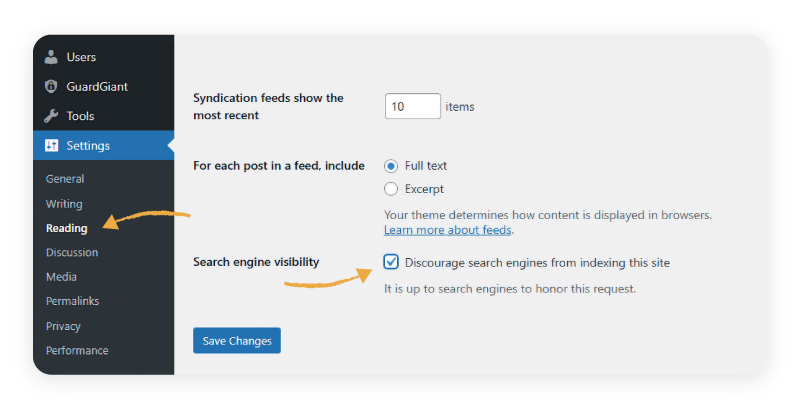
- Go to your WordPress dashboard and navigate to Settings > Reading.
- Check the box labeled “Discourage search engines from indexing this site” and save your changes; this will add a noindex tag and update your robots.txt file to ask search engines not to index your site.
- If you only want to hide specific pages or posts, use an SEO plugin like Yoast SEO or RankMath to set individual content to “noindex” in the page or post settings.
- For extra privacy, avoid adding these pages to your site’s navigation menus or sitemaps, and don’t link to them from other public pages.
- Share the direct URL only with trusted individuals, as anyone with the link can access the content without needing a password or subscription.
If your content is highly sensitive, consider combining these steps with additional security measures outlined above. Still, for most use cases, these settings will keep your WordPress site or page out of search results while remaining easy to access for anyone you share the link with.
Take control of your site’s privacy today
Making your WordPress site private is a powerful way to protect sensitive content, build exclusivity, or keep things under wraps until you’re ready to share. With options like password protection, membership plugins, and maintenance mode, you have flexible tools to match your privacy needs.
Ready to take your site’s security even further? Discover more ways to safeguard your WordPress website by checking out our guide to more essential protection strategies.
More articles from us!
How to build a small business website using WordPress
How to integrate business phone service with WordPress
