Yoast SEO tweaks to perform right after WordPress setup


WordPress setup is the first step in creating a website, but it doesn’t end there. In order to ensure your website is optimized for search engine performance, you’ll need to make a few key SEO tweaks using the popular Yoast SEO plugin. This plugin helps website owners configure the necessary settings to improve their website’s visibility in search engine results and maximize their search engine optimization.
WordPress is Google-friendly, straight out of the box. Experts confirm this. Yet these same experts offer advanced SEO plugins and solutions for WordPress websites. How come?
It’s because there is always something to improve. Here’s what the Yoast SEO plugin by Joost DeValk, one of our foremost blogging superheroes, enables you to do. Ideally, you change these settings right after WordPress setup.
The following tweaks can substantially affect your standing on Google and beyond.
How can you implement these changes yourself? Just download and install the Yoast SEO plugin and follow the instructions below or the links to more detailed tutorials.
What is the Yoast SEO plugin?
Yoast SEO is the most popular “all-in-one” WordPress plugin for search engine optimization (SEO) with millions of active installations, and some would argue the only WordPress SEO plugin you need.
It’s also considered “the best SEO plugin” for WordPress by Syed Balkhi, another one of our blogging superheroes.
The free version already offers plenty of features that improve your overall findability and visibility in the search results.
What are typical issues that can be handled with additional WordPress SEO plugins or measures?
- Duplicate content
- The wrong kind of content being indexed
- WordPress theme issues
Of course, it all depends on how well-optimized your website is already. More on that is below. Here is what to do right after installation:
Change the post title tag
Do not show your homepage title everywhere. When you have optimized the title tag of your homepage, it will probably be too long and contain some keywords that are redundant or irrelevant to actual posts. Moreover, they will most likely create duplicate content in the eyes of Google bots.
Initially, we came up with a title, “Best Managed WordPress Hosting from EasyWP” on the homepage of our static website. When we moved to WordPress this title suddenly appeared on several pages and then once the blog went live, every single post, category or other page had “Best Managed WordPress Hosting from EasyWP” attached to it:
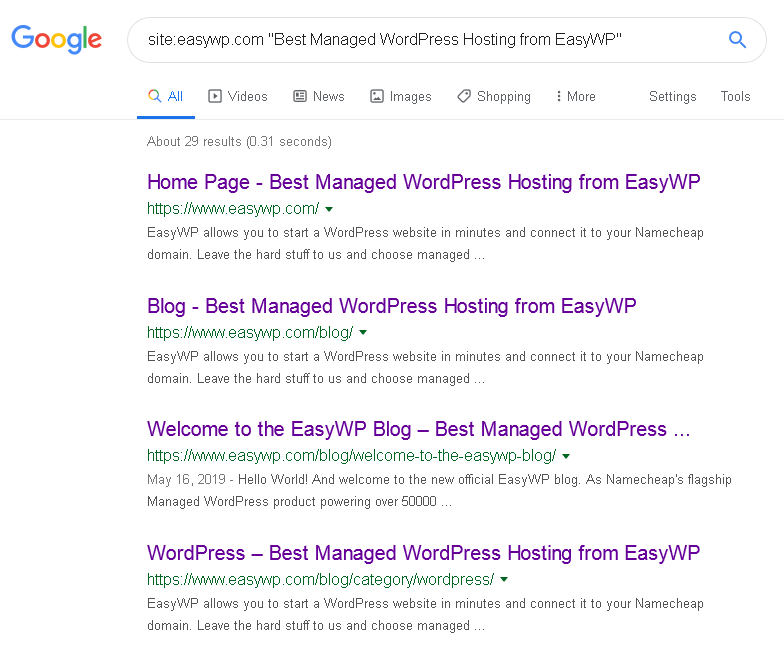
Often the actual title or headline of a blog post would be shorter than the added “Best Managed WordPress Hosting from EasyWP” suffix. This actually harmed the relevance of every single post on Google. Such repetition is frowned upon by Google. Now we’ve learned our lesson and have only added “EasyWP” at the end of each blog post title.
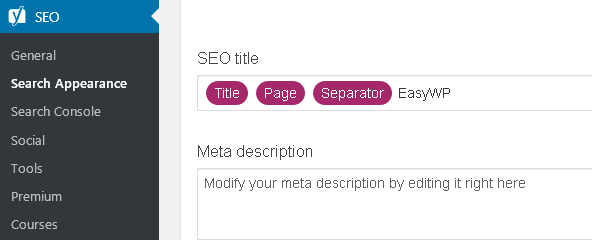
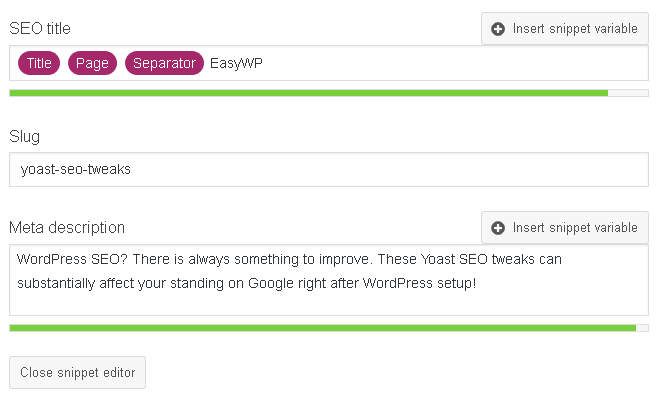
You can go to Yoast SEO -> Search Appearance -> Content Types -> SEO title and simply add your site name:
The Google results screenshot above also shows two other issues we will discuss down below: duplicate meta descriptions and indexed categories. Let’s start with why indexing categories might not be such a good idea.
Disable category indexing
Categories are often duplicates or are considered to be “shallow content” by Google. They are useful for navigating around your website once somebody is already visiting it but in most cases, it won’t be helpful when searchers find your website through search engines.
Sometimes you can rank higher with category pages than actual posts but it only makes sense when your categories are really optimized for outside visitors using them as a landing page. On most WordPress themes this will not be the case.
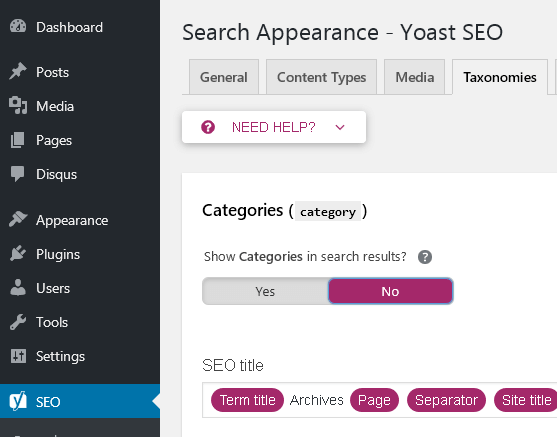
Our suggestion? Go to [SEO -> Search Appearance – Taxonomies] and choose “no” under the question “Show Categories in search results?”. It’s set to “yes” by default so you’ll need to change that setting.
Did you make your category pages search engine optimized on purpose? Then you can consider allowing your category pages to stay indexed. The same thing applies when you’ve made sure they lead somewhere important or at least kept people on the website instead of making them leave.
Another exception to the rule? Static websites where categories are meant to serve as actual menu items. For example, let’s say you run a small business website with the structure
example.com/services. Here, the service is a category that leads to actual pages that explain each service. In this case, of course, you’d want to keep the service categories indexed.
On the other hand, it would be a better idea to create a dedicated page for your services and then link to each particular service page from that overview.
When in doubt, ask yourself: are my category pages well-optimized for Google users and beyond? If you answer “don’t know,” “not sure” or “no,” then it’s better to remove the categories from the Google index and focus your optimization efforts on actual posts and pages.
Resolve potential conflicts with other plugins

Some WordPress themes or other plugins can interfere with the free Yoast SEO features and settings. In some cases, Yoast SEO even discovers potential conflicts itself. We had a conflict with an existing Google Sitemaps plugin.
With themes you have to be careful. Such conflicts are only visible when you look up the actual title tags, for example.
As we’ve already used the Google Sitemaps plugin and have invested a significant amount of time in adding custom sitemaps for both written content and images, we didn’t want the Yoast SEO free sitemap to be automatically added. We resolved the potential conflict instead by “toggling” the Yoast SEO sitemap.
Under [SEO -> General -> Features -> XML Sitemaps] we chose “disable.” You can enable this feature at any time once you decide to use the Yoast SEO sitemap.
In case you weren’t aware of any sitemaps or other SEO plugins already present on your WordPress installation, sticking to the standard Yoast SEO sitemap is a good idea. You can even test it with Google Search Console before submitting.
Provide unique meta descriptions
While meta tags are not a ranking factor on Google, they are one of the most important pieces of information potential visitors see in the search results. The title and the meta description make them click through or ignore your page.
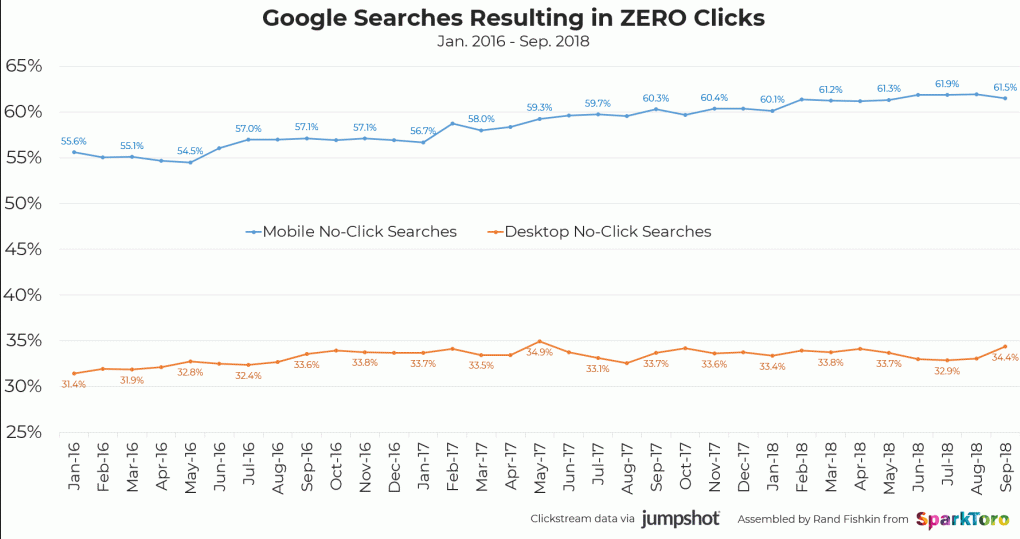
This is why you need to convince them to visit your website or at least offer the most important information in your meta descriptions so that “no click” searchers get your phone number or whereabouts to locate you, not your competition.
For local businesses, it’s a good idea to add the area you serve and the phone number right up on top of your title and meta description. People who are on the run, then, can just click the phone number and call you directly.
No matter what you do, make sure that your meta descriptions are unique for each and every page, post, category, etc., and make them useful or enticing enough to convince searchers to click the link to your website.
To make people click, make sure to add a so-called “call to action”. A meta description such as “The most beautiful holiday destinations in Greece view the photos in the post” has both a CTA and a convincing message.
To change the meta description just repeat the steps of changing the title tag and enter something in the text area below the title.
You can also add your custom meta description after each post! It looks like this:
What else should your meta description entail? Check out Yoast SEO’s whole list of suggestions.
Add social media accounts and Open Graph meta tags
Nowadays, social media and search engines are heavily intertwined. All social media websites have their own search engines. When they can get it, search engines love social media content.
Even when reading the actual feeds, you can improve the visibility and findability of your content by using meta tags solely made for social media sharing. These so-called “Open Graph” meta tags work for Facebook, Twitter, and Pinterest.
Yoast SEO supports the Facebook and Twitter meta tags that create an enhanced view of your content. Facebook and Twitter are enabled with meta tags, straight away. For Pinterest, you’ll need to verify your website first.
When setting up, you can add your social media accounts such as Facebook, Twitter, and Instagram to Yoast SEO. You simply do this by typing the user or page names/addresses from those third-party websites:
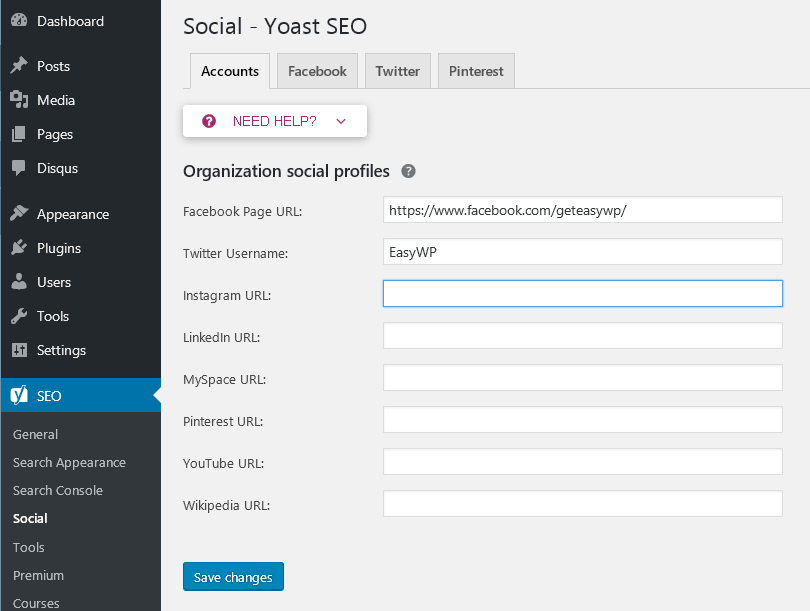
They ask you for the account names in their configuration wizard but you can also add your social media whereabouts later on in the Yoast SEO menu under the menu item “social.”
Do take note that some of the “social” features are only available in the premium version of Yoast SEO.
True SEO for everyone, not just geeks
Even though some of the features described above are part of the premium Yoast SEO package, it’s still dedicated to the “SEO for Everyone” slogan.
Like EasyWP, they democratize technical solutions and features that have been expensive and only made for the chosen few several years ago.
In 2019, you don’t have to pay for an expensive agency to gain the professional fundamentals of onpage or technical SEO.
You don’t have to be a geek to understand SEO or even rich to be able to afford high-value tools and technology that were formerly available to a small, elite group.
Yoast SEO Premium costs $89 (79€ + tax) including a year of updates and support for one website. It’s definitely the affordable solution given the fact that any SEO company would charge far more for their services.
More articles from us!
Best Amazon Affiliate WordPress plugins in 2025
7 best Gutenberg blocks plugins for WordPress
