How to create a blog on WordPress in 10 minutes or less

Blogging is the third most commonly used content marketing strategy by digital marketers, small and medium enterprises (SMEs), B2B businesses, and large market players. One of the most reputable blogs on the web, HuffingtonPost, earned approximately $14 million in revenue in 2018. And this is a figure generated through Google Adsense monetization, affiliate marketing, and membership subscriptions.
Creating a WordPress blog is not complicated since you don’t have to be a tech geek. Platforms like EasyWP make it very easy to set up your WordPress blog in less than two minutes with their inbuilt one-click install features. However, if you want to understand the setup process, this article is for you.
Before I walk you through the step-by-step process of creating a blog on WordPress, you must understand the differences between WordPress.com and self-hosted WordPress (wordpress.org).
WordPress.com vs. cloud-hosted WordPress
WordPress.com is a service that helps you automatically build your blog using a version of WordPress software. Technically speaking, WordPress.com does a lot of the work of putting your blog on the internet and making it visible to others. You don’t have to install the WordPress software yourself or purchase a separate hosting service.
However, WordPress.com is riddled with some disadvantages, including the expensive cost of setting up your blog and limited analytics visibility. Also, certain features, including importation of themes, plugin installation, and monetization, only come with expensive plans.
To eliminate all these limitations, choose a managed WordPress hosting provider, such as EasyWP by Namecheap. We built the first cloud platform developed exclusively for WordPress websites. The benefits of a cloud-hosted WordPress blog include:
- Low setup cost
- Distributed virtual server infrastructure
- Unlimited access to premium themes
- Free importation and installation of plugins
- File export and blog monetization
Of course, you don’t need to know a single thing about CSS and HTML before you can create a cloud-hosted WordPress blog. Follow the steps below to launch your blog today without coding.
5 steps to set up your blog on WordPress in 10 minutes
In this article, we will create a WordPress blog using EasyWP with picture previews to help you understand better.
Step 1: Name Your Website

Step 2: Choose A Hosting Plan
A hosting plan is needed to launch your blog on the internet and make it available for crawling by search engines.
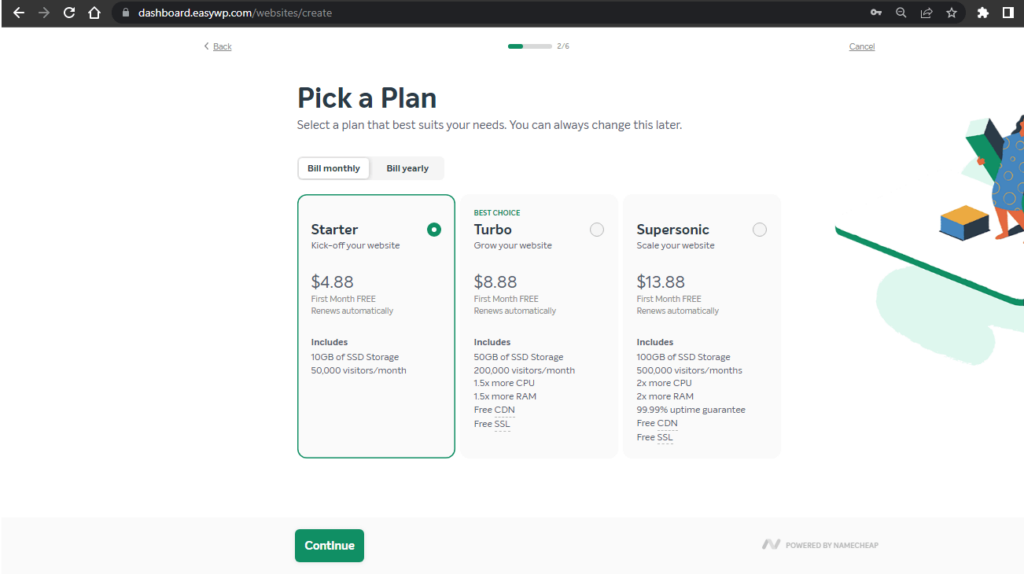
EasyWP has three hosting plans – Starter, Turbo, and Supersonic. The starter hosting plan is perfect for small businesses and personal bloggers with an expected monthly visitor of less than fifty thousand.
Turbo and Supersonic hosting plans have a capacity of two hundred thousand and five hundred thousand monthly visitors, respectively. And surprisingly, you can get any of them at an unbelievably cheap cost compared to similar hosting services from other providers.
Some of the additional perks you get from choosing an EasyWP hosting plan include:
- Pre-installed WordPress software
- Backed by Namecheap Cloud
- Fastest WordPress hosting
- 24/7 support
- Easy updates and backups
- Free CDN and SSL installation
Choose one of the hosting plans listed above to create a WordPress blog. Consider your budget, the expected number of monthly visitors, and the required bandwidth.
Follow the prompts and register an account with Namecheap. Since EasyWP is backed by Namecheap Cloud, you can log in to both platforms with the same details. If you are using another hosting service, the steps will look different. However, we hope you will choose one of our affordable WordPress hosting plans.
The next step is to choose a domain name.
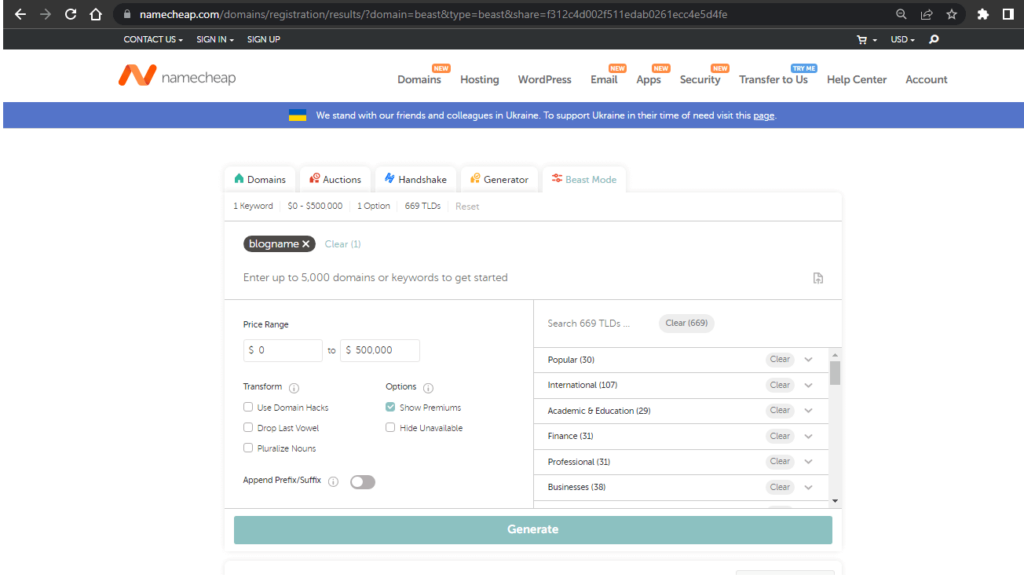
Step 3: Choose A Domain Name
Choosing a domain name is one of the most difficult decisions to make when creating a blog. While it sounds so easy to do, there are several factors to strictly consider before choosing one.
- Make it short and simple. Your domain name should have a maximum of about 12 characters. Too many characters is not a good thing for your blog’s SEO.
- Use names relevant to your blog content. If you are blogging about health and lifestyle, using a domain name like political.com is not plausible.
- Get a .com domain if it’s available, or look for another relevant TLD. Generally, .com domains have more recognition for blogging purposes. Others like .edu, .org, and .net are more useful for organizational websites.
- Avoid using symbolic or numeric characters. Text characters make it easy for readers to remember your blog. WordPress.com sounds better than word2press.com.
Now that you know the simple rules, brainstorming name ideas is no less difficult. Make use of the domain name generator by Namecheap to generate lines of relevant names centered around your blog content.
Go through the list of generated names and pick the most appropriate one for your blog. Add to cart and proceed with payment on the checkout page.
The newly purchased domain name will automatically appear on your EasyWP dashboard. Click on the registered domain name and continue.
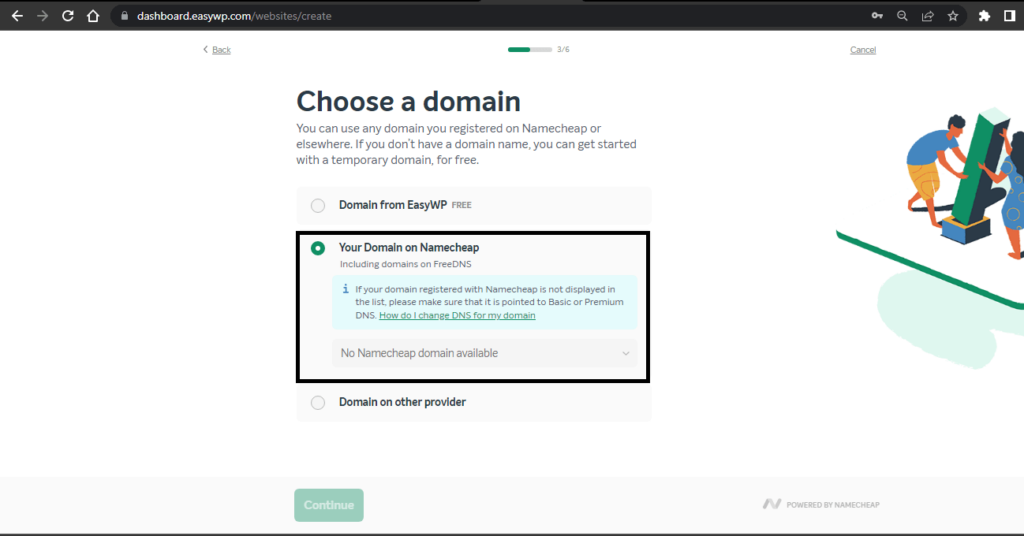
If you want to use a temporary domain name, click the first option (Domain from EasyWP) and enter a name.
Also, you can easily link a domain obtained from another provider using the third option (Domain on another provider).
Step 4: Pick A Theme And Add Useful Plugins
This step can be skipped manually if you want to access a broader range of themes and plugins after your WordPress is fully set up. The latest default theme (Twenty Twenty-Two at the time of writing) will be automatically selected until you change it.
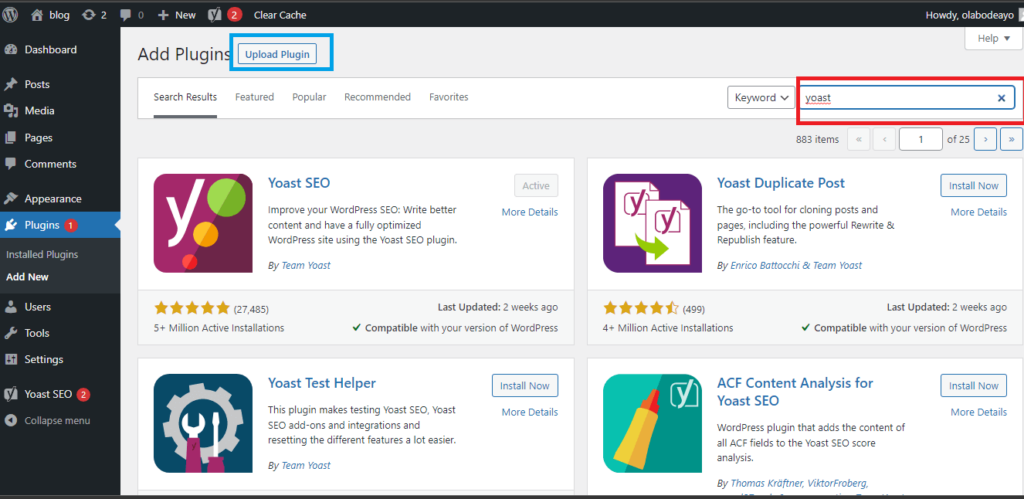
Otherwise, you can pick from the limited list of themes. Plugins like Yoast SEO and Brizy Website Builder are essential for your blog. For e-commerce WordPress blogs, you can install the WooCommerce plugin.

Once you are done with selecting a theme and adding plugins, proceed to checkout. It takes only a few minutes for your WordPress blog to be fully set up after payment. This process is slightly different from Namecheap shared hosting, but simple and efficient either way.
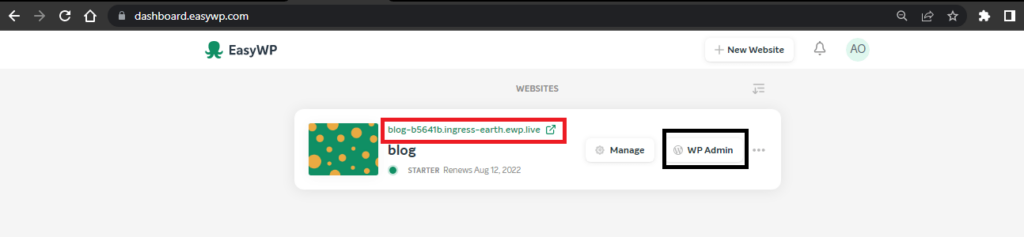
And that is it! The EasyWP dashboard will display a collection of all your blogs. Click the “WP Admin” button to view your WordPress dashboard and customize it, or click on the red highlighted link to view your new blog.
Step 5: Customize Your Blog
Now that you have your pre-designed WordPress blog, you are ready to share your ideas with the world. However, you might want to change a few things to make your blog look better and entertain your readers more.
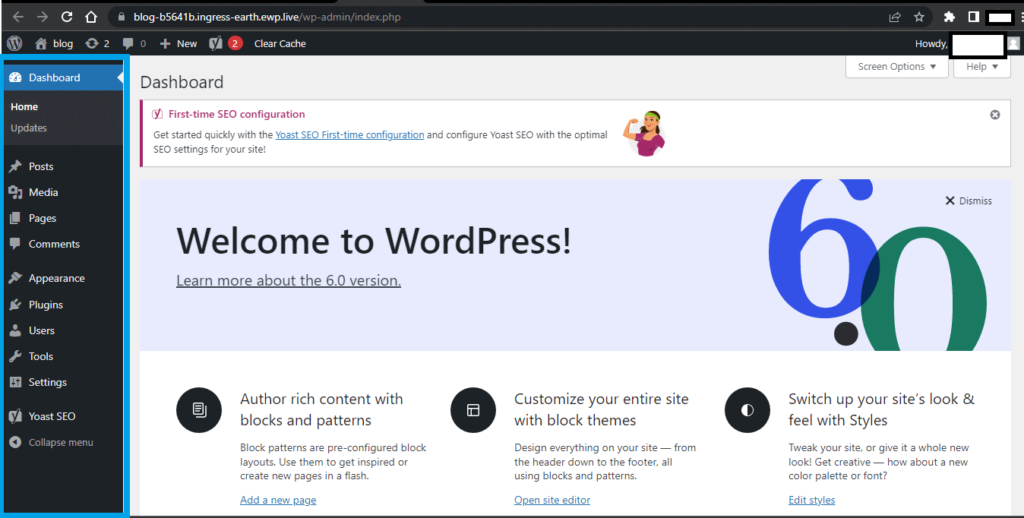
Click the WP Admin button and visit your WordPress Dashboard. On your dashboard, there are some relatively spaced segments and easy-to-navigate options. But our major concern is the left menu list that contains buttons for posts, pages, appearance, plugins, widgets, and many others.
- Choose A New Theme
Not everyone is a fan of the “Twenty-two” default theme, and you might want to spice things up for your readers by changing to a new theme.
Premium WordPress themes are often the best to use since they are designed to house a lot of useful functionalities. Some free themes can also get the job done if you are on a low budget.
Get a premium theme by searching directly for it from the Appearance > Themes option on the left bar.

You will be shown a list of your already-installed themes like Twenty Twenty-two and Twenty-Twenty below. Click the “Add new” button to see a list of other beautiful themes like Astra.

If you are not sure of the perfect theme for your blog, scrolling through the whole pool of these designs might be a good idea. Another way to hasten up the process is by typing in a keyword reflecting your blog’s idea into the search bar located at the top right corner. Doing this streamlines the results you get.
Alternatively, you can download premium themes from design websites like StudioPress and import them directly to your WordPress account.
Click the “upload theme” button and select the unzipped downloaded theme file from your local PC for upload. Follow the remaining prompts to install and activate.

- Customize Your Site Title, Tagline, And Favicon
A new WordPress blog comes with a default site title and taglines. To personalize these, navigate to Appearance > Customize.
Usually, you will see something like “site identity.” Click the button and change the details inside. Publish your changes.
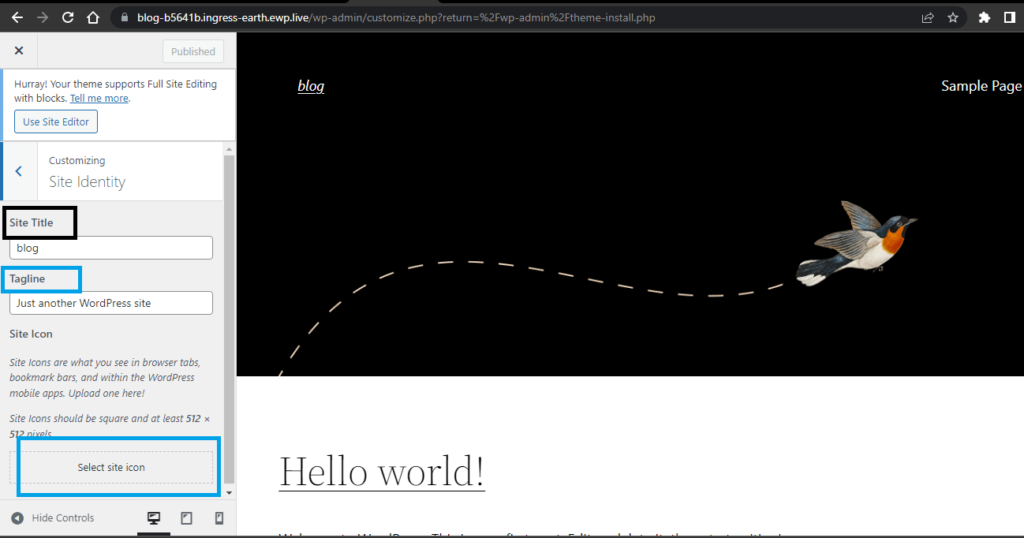
You should upload a personalized icon for your new blog. The best pixel is 512 x 512.
- Add Some Useful Plugins
Plugins can be WordPress tools or third-party applications designed to enhance the functionality of your blog. Some plugins work to speed up your blog, others improve its SEO and a few deal with security installation through the use of SSL.
Some of the useful plugins to install include YoastSeo for SEO, Litecache for speed, and Elementor for drag and drop design.
To add these, navigate to Appearance > Plugins > Add new. Type in the plugins you need, and install and activate them.
You should, however, be careful of the plugins you install. Overstuffing your blog with different useful plugins can do more harm than good. Similar to how you can upload themes locally, you can also download plugins from third-party websites and upload them.
Step 6: Publish A New Post
Eager to let the world know about your blog? Navigate to the post menu (Posts > Add new) and write your first blog post.
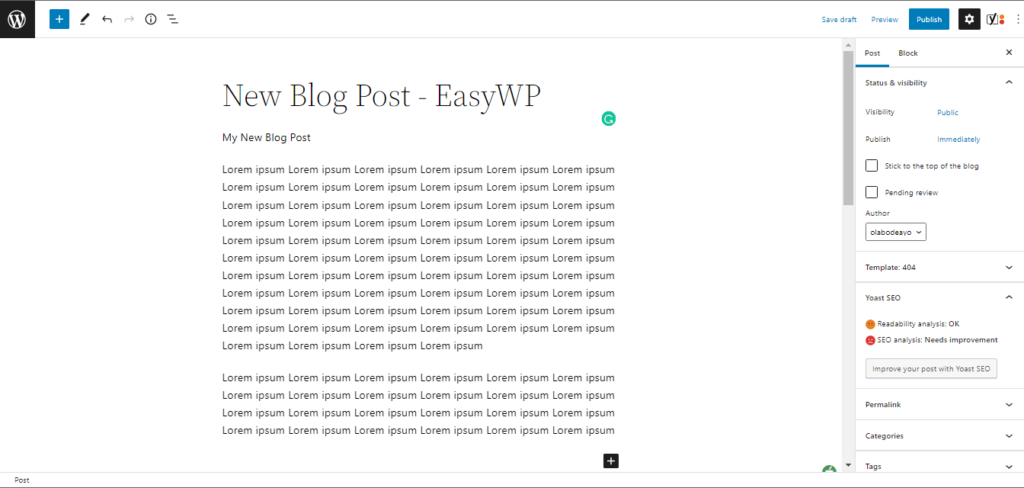
The process is actually quite simple, as all you have to do is type in your content or import them from Google Docs. Address the headlines and tags using the setting functions.
The Yoast SEO plugin helps optimize your content before publishing so it can rank better on search engines.
Customization and beyond
You can still do a little bit of customization by reading how to use WordPress Customizer (The ultimate go-to tutorial).
Overall, WordPress is a beautiful (content management software) CMS for launching your content marketing strategy. Even if you are not a business owner, blogging can create a passive income source through monetization.
Use easy-to-manage hosting services by EasyWP to get started and launch your blog in less than 10 minutes today.
More articles from us!
