How to use WordPress Customizer (The ultimate go-to tutorial)


Like many features of WordPress, the built-in theme customizer allows you to easily make changes without having to understand a single line of code or technical jargon.
In this WordPress Customizer tutorial, we’ll provide easy-to-follow steps that you can refer to at any time. Before long, you’ll be changing page elements on the fly, altering background images, and customizing menus.
Where is the WordPress Customizer?
Finding the WordPress Customizer is straightforward. After logging on to your WordPress admin area, navigate to Appearance > Customize.
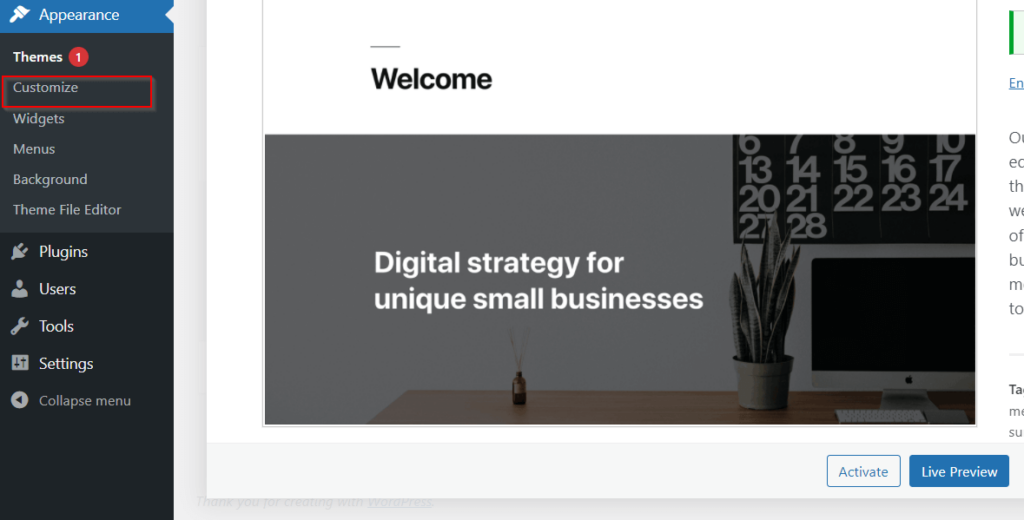
If you want to see a preview of a theme before you activate it, locate a theme and choose Live Preview.
Navigating your way around Theme Customizer
Now you know where the Theme Customizer is and how to see a preview of your theme, it’s time to discover the default options.
See the circular blue icons with a pencil icon floating around the right of your screen? Click on any of these, and you’ll be able to view the settings for that element.

Let’s take a quick look at each default option in Theme Customizer.
Changing your tagline and adding a logo
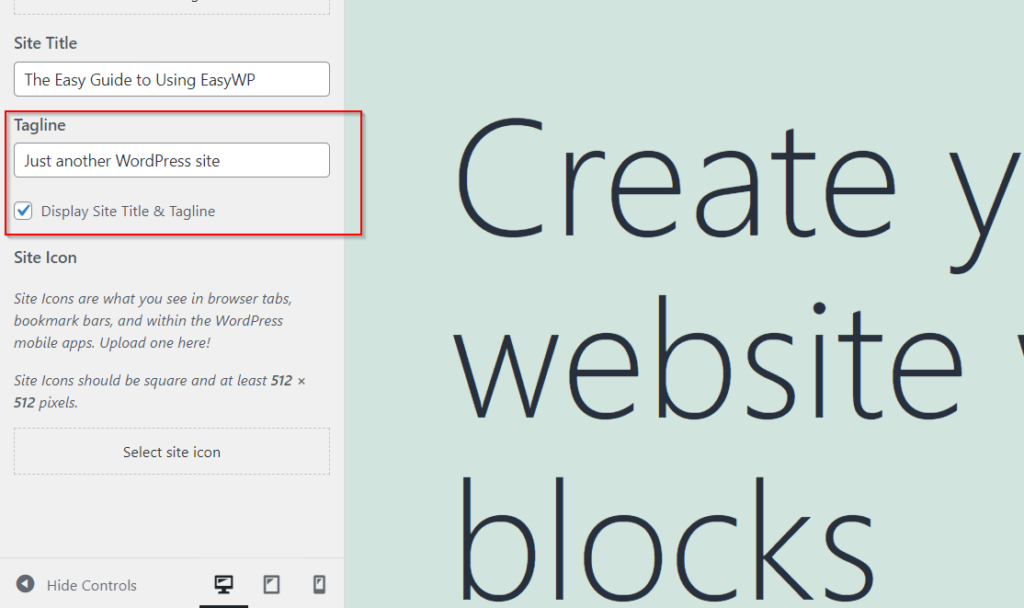
We’ll start with the basics. As the name suggests, Site Identity gives you the ability to change the title and tagline of your WordPress website. You may be wondering why you see Just Another WordPress Site in the tagline field. Don’t worry – this is WordPress giving you a default tagline. The good news is you can change it, and you probably should. However, if you’re struggling to think of one, you can always leave it blank.
The Site Identity panel is also where you can add your site logo. Click on Select logo, and the Media Manager will open up. From there, you can either choose an image from the Media Library or upload a new one.
While you’re in the Site Identity panel, you might also want to add a favicon to your site. Confusingly, WordPress calls these “Site icons”, but their function remains the same – to show up in bookmark bars, browser tabs, and mobile apps.
Adding your favicon/site icon follows a similar process to adding your logo. Click on Select site icon and choose an image from the Media Library or upload one from your device.
Changing your website color scheme
The limitations of the Colors panel will depend on what theme you’re using, meaning some themes will have fewer options available than others.
To change your color theme, use the color picker tool or alternatively, make use of Hex color codes to alter your background image.
Want to give your visitors more options on how they view your site? Turning on Dark Mode means your site will display a dark background and light text.
You can always use the Block Editor if you want more customization options. Every block can contain a color setting, allowing you to have more control than the Theme Customizer. To use the Block Editor, click Color Settings when you’re in the block you want to change.
Creating your navigation menus
The Menus panel in WordPress Customizer allows you to easily add a range of menu items and reorder them to suit your website style. After clicking on Menus, you’ll be able to add a new menu by choosing Add a Menu.
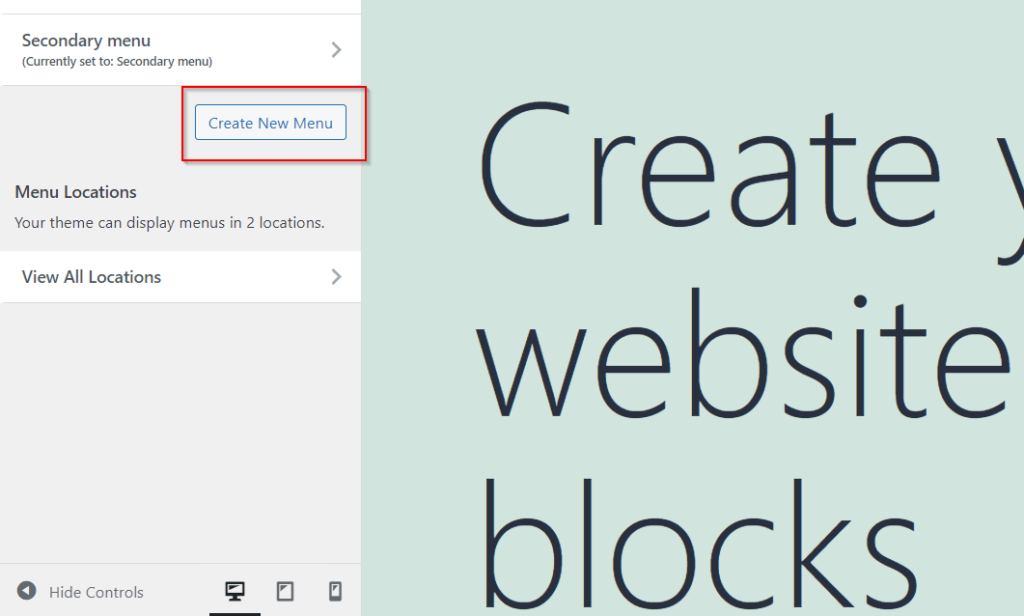
Type in a name for your menu, and click Create Menu.
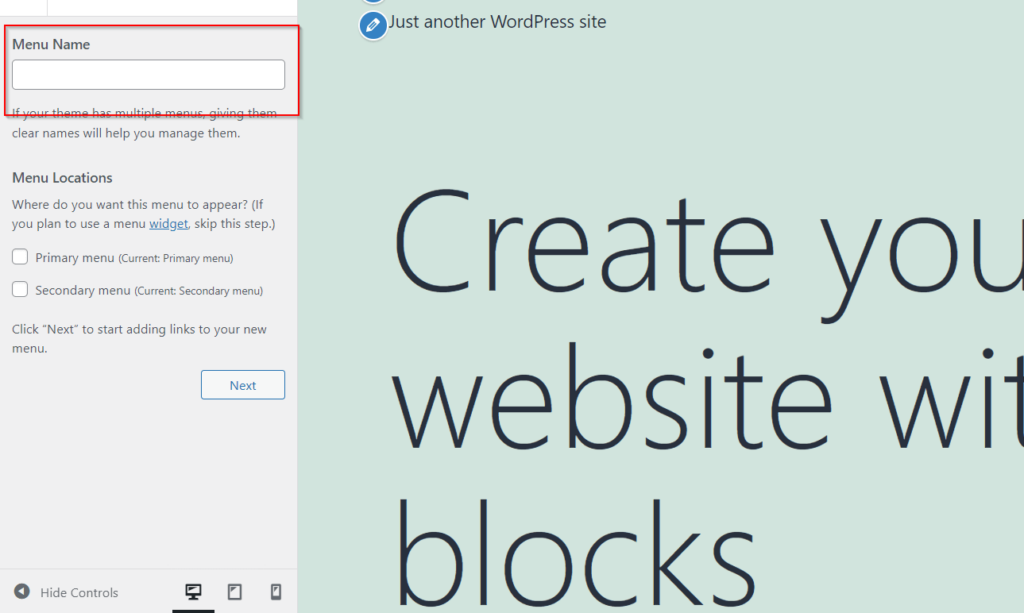
On this panel, you can also determine whether you want the menu to be a Primary or Secondary menu.
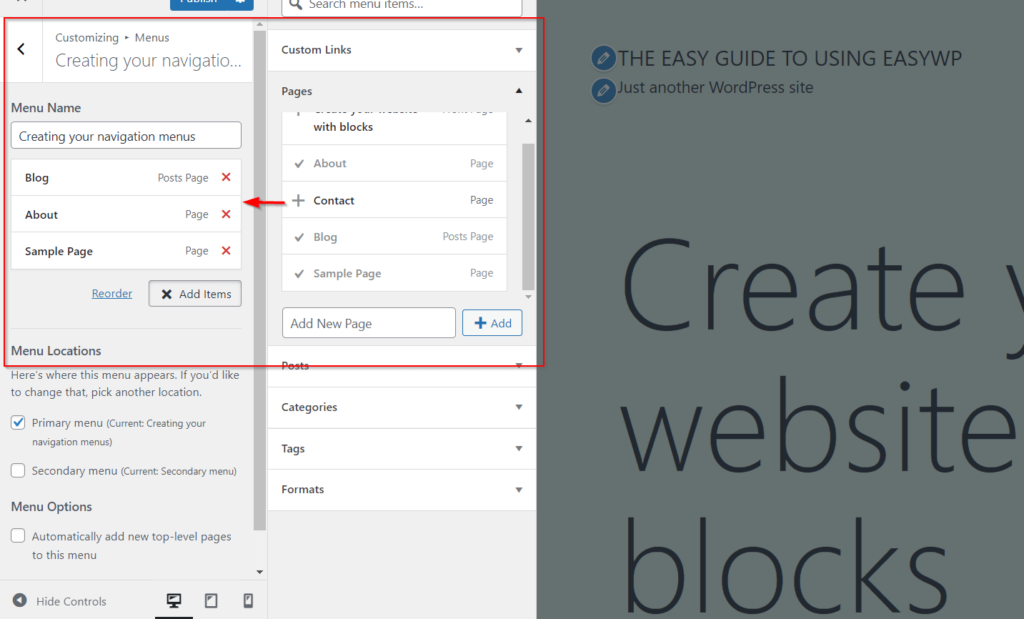
It’s now time to start adding items to your menu. Click on Add Items, which will slide out a new panel to the right with a new set of options.
Here you’ll be able to add:
- Custom links
- Pages
- Posts
- Categories
- Tags
- Menu items
Now you can start selecting which items you’d like on your new menu. Selecting an item from the right panel will change the plus sign to a tick. Notice how the items start appearing under your Menu Name?
You can reorder your menu items by clicking Reorder. The box will change to show several arrows. Don’t worry, it’s not as complicated as it looks.
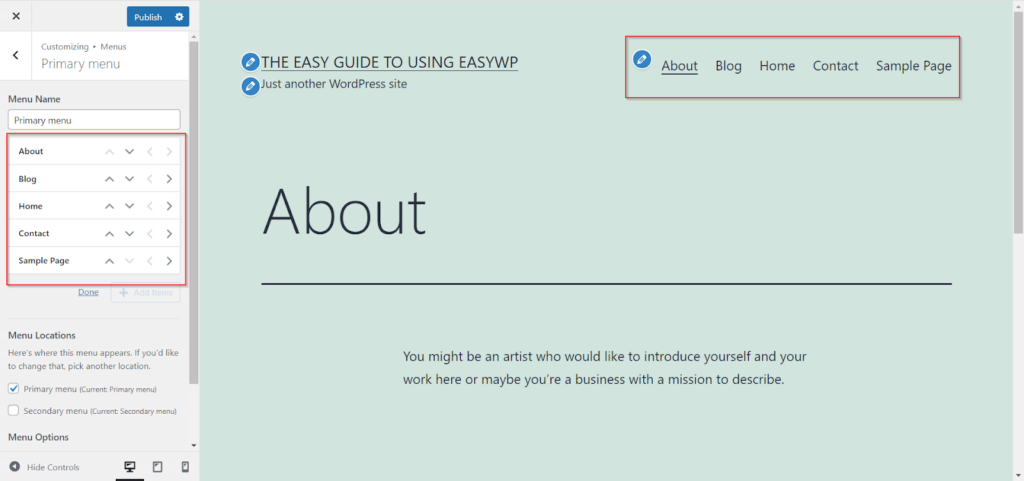
Essentially, the vertical arrows change the order your menu items appear, whereas the horizontal arrows transform a menu item into a sub-menu item. Try it for yourself to see how it works! Remember, you can see how your changes are reflected in real-time using the live preview window.
Managing your website widgets
WordPress 5.8 introduced a new block-based widgets editor to the Widgets screen. This means you can now manage your widgets directly in real-time. However, if you’d prefer to use the panel interface that we’ve been using throughout this tutorial, you can revert by following one of the methods in this block-based widgets editor article.
To see which widgets you can edit using the new block-based view, look for the pencil icons next to your widgets.
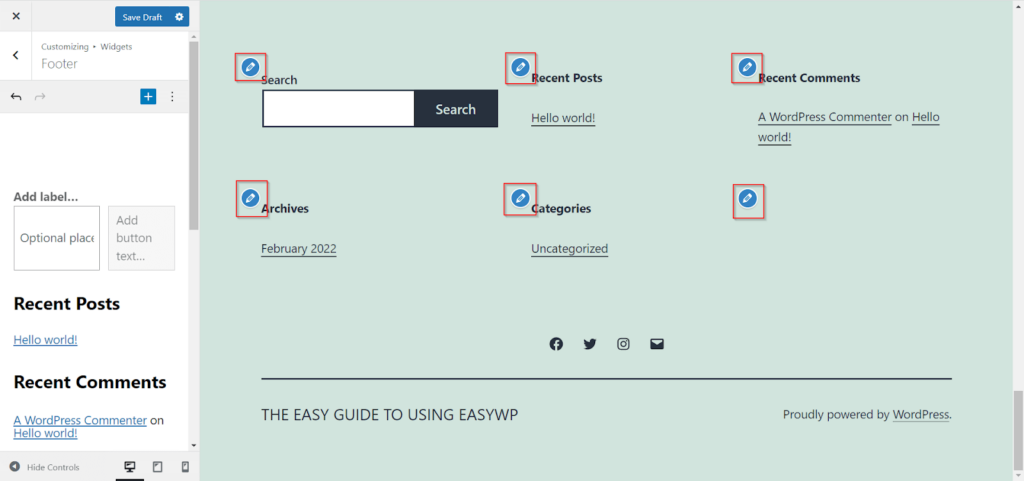
If you’ve reverted to the older style Widgets panel, you can easily manage several aspects of your site’s widgets, including adding and removing them. There are a variety of widgets you can have on your website, such as a Gallery, Calendar, and Search.
Like the Colors panel, the options you have at your disposal will differ depending on what theme you’re using.
To add a new widget in the classic panel interface, click the Add a Widget button, which will allow you to view a list of all the potential widgets you can add to your site. Click on the widget you’d like to add, and you’ll be able to adjust its position by dragging them.
Customizing your homepage to be a landing page
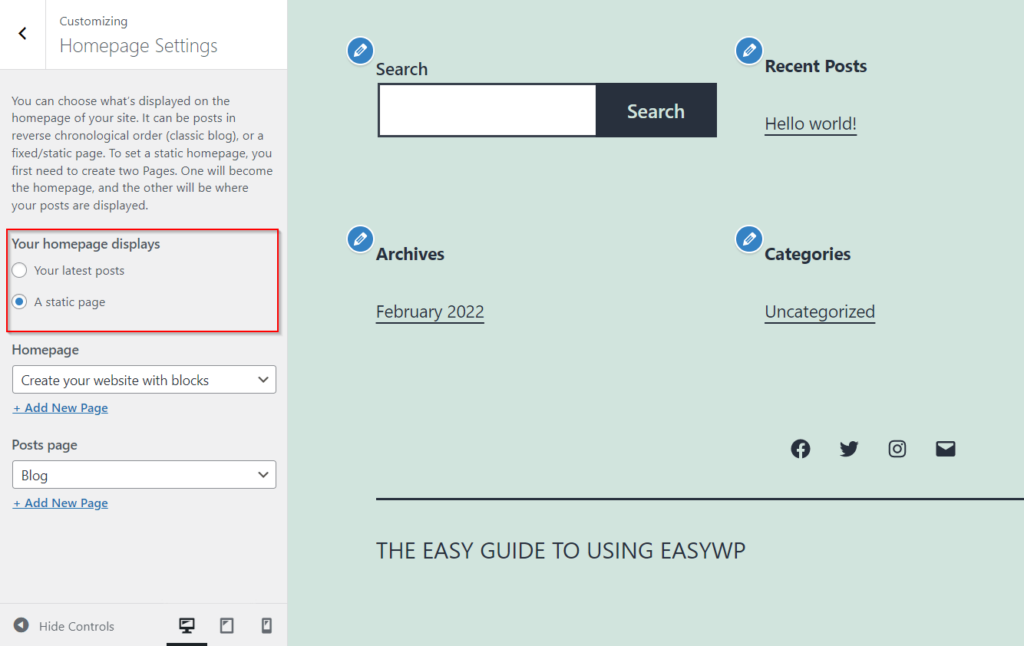
If you don’t want WordPress to show blog posts on your homepage by default, you’ll be pleased to know there’s a way to change it. To create a landing page, you need to navigate to the Homepage Settings panel and select the A static page radio button.
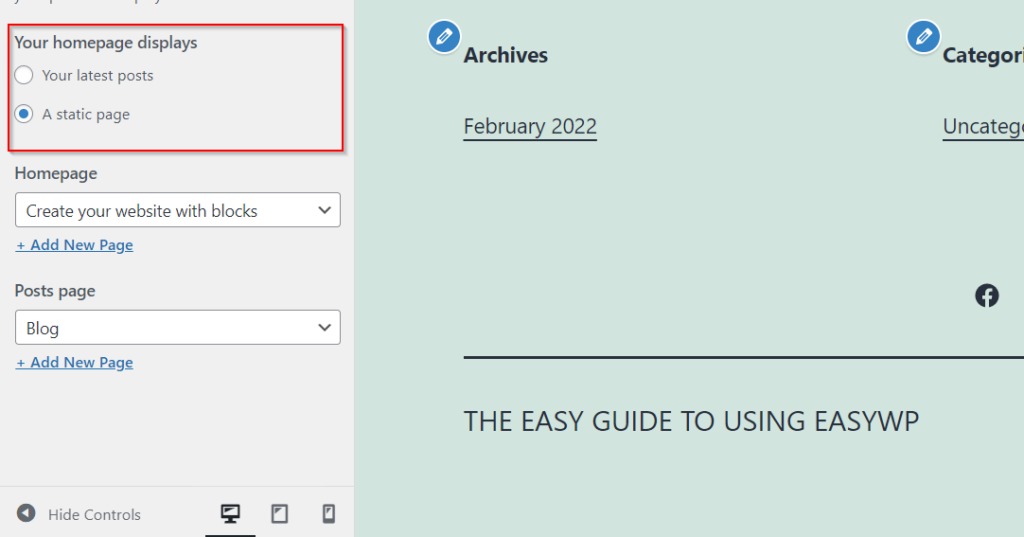
You’ll be presented with 2 additional dropdown menus. Use these to choose a page for your homepage.
Don’t already have the pages set up on your site? Create a new page by clicking Add New Page. You’ll then be able to create a blank page and give it a name.
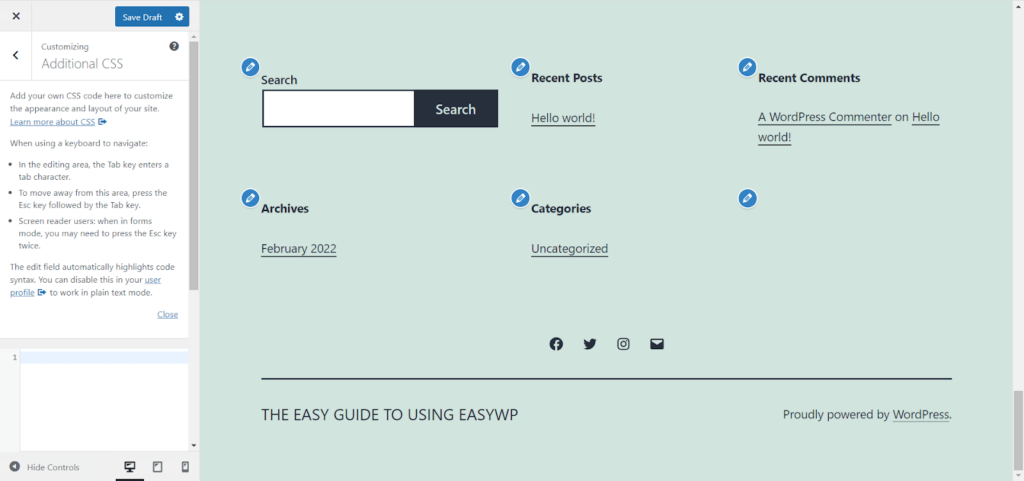
Adding CSS code to your site
Theme Customizer allows anyone, both technical and non-technical, to build a website. However, if you’re looking to venture further outside the basics, WordPress includes a panel for adding CSS (Cascading Style Sheets) to help you style the website to your precise needs.
While intermediate and advanced WordPress users often add CSS code via a style.css file, Theme Customizer’s Additional CSS panel is an ideal way for beginners to add code and see the results in real-time. To further aid beginner coders, WordPress will cleverly suggest attributes on the fly, as well as flag errors if a CSS statement is wrong.
See how your website looks on different devices
Making sure your website looks great on mobile devices shouldn’t just be an afterthought but an essential part of your website development. Luckily, WordPress makes it easy to quickly see what your website will look like on different screen resolutions.
Look below the Theme Customizer panel, and you’ll notice 3 screen icons, as well as Hide Controls. Switch between these different views to see what your site will look like on other devices, such as tablets and mobiles.
Want to get a better view? The Hide Controls lets you get a better desktop view by hiding the panel.
Save your work by publishing, saving a draft, or scheduling
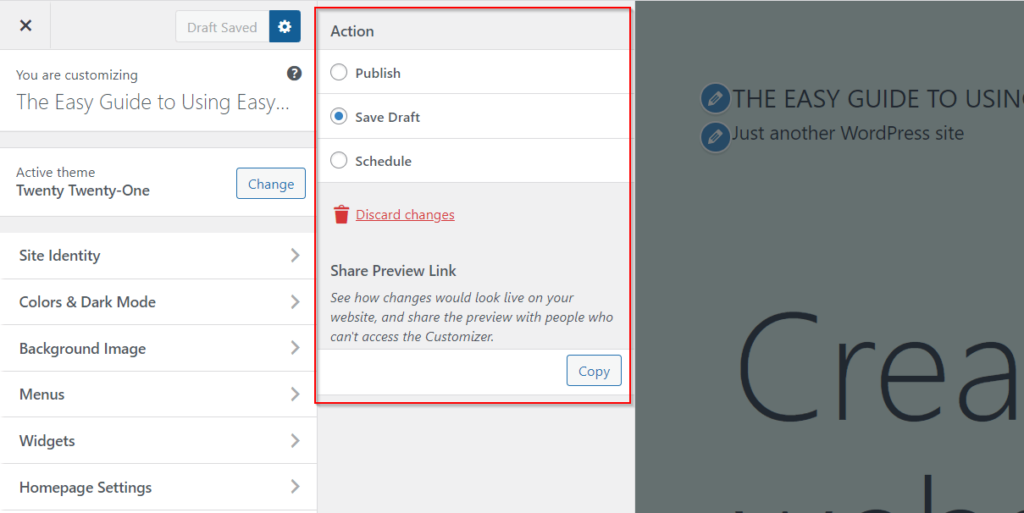
Once you’re ready to get your work out there, you can click the Publish button. However, if you’re not ready to show your new design to the world, you can always save a draft instead.
Click the gear icon, which is located next to the Publish button, and you’ll open up the Action panel. Here, you can choose to Save or Schedule your work by selecting the relevant radio button. Scheduling allows you to choose a specific date and time, which is handy if you want your theme changes to go live, for instance, when you receive less web traffic.
As you’ve seen, the WordPress Customizer is an easy-to-use tool that allows you to make changes to your WordPress site without any coding knowledge. The layout is straightforward to navigate, and enables you to visualize any changes you’re making in real-time.
We hope you’ve enjoyed reading this tutorial. Let us know whether you’ve found it useful on Twitter.
More articles from us!
Google Authenticator – Enhancing WordPress security with 2FA
Adding JavaScript to WordPress – your step-by-step guide
