How to change the WordPress login URL the right way


If you’ve spent any amount of time building, creating, and developing on the WordPress platform, you know that finding the default WordPress login is incredibly simple.
Just append “/wp-admin” to the end of any website running on WordPress, and you’ll be at the front door of the content management system.
Coupled together with a weak password and you’ve just created a playground for malicious attackers to freely exploit. According to security expert Sucuri, of the 14.5k sites they checked, 22.61% of the malware injections in Q3 of 2022 were massive malware campaigns directed at the WordPress platform.
While changing the WordPress login page URL isn’t 100% foolproof from attackers, it’s one extra step you can take to make it more difficult for them.
In this article, we go over two common methods of changing your login URL as well as additional security measures to help thwart attackers. These steps apply for most shared or dedicated hosting WordPress installations, but please watch for special notes related to differences with EasyWP managed WordPress
Changing your login URL with the WPS Hide Login plugin
If you prefer not to modify core WordPress files, you’ll want to try this option out first. Of the two methods, this is by far the fastest implementation.
As with many customizations for WordPress, there is a plugin to customize your login URL. With over 1 million downloads, the WPS Hide Login plugin has over 1900+ 5-star ratings, so you can be sure it will be around for years to come.
Installing the WPS Hide Login plugin
To get started, head over to the official WPS Hide Login download page. After you’ve downloaded the plugin, install and activate the plugin by following these steps:
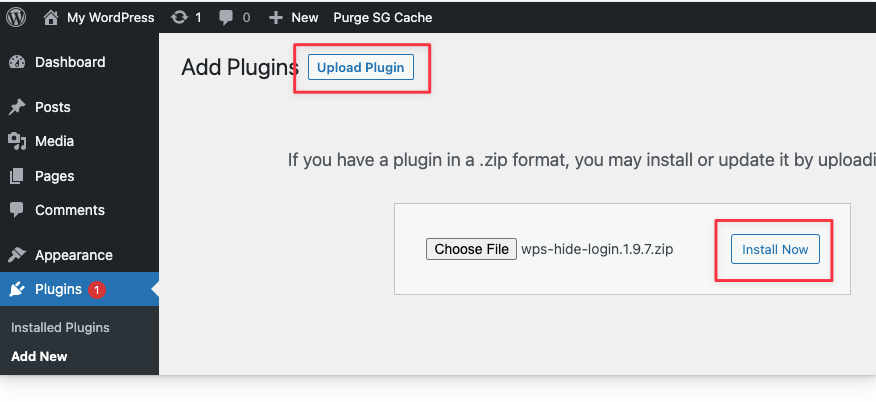
- In the WordPress Dashboard, find Plugins > Add New
- Click Upload Plugin
- Click Choose File, and select the login plugin
- Click the Install Now button
- When prompted, click the Activate Plugin button
Configuring WPS Hide Login plugin
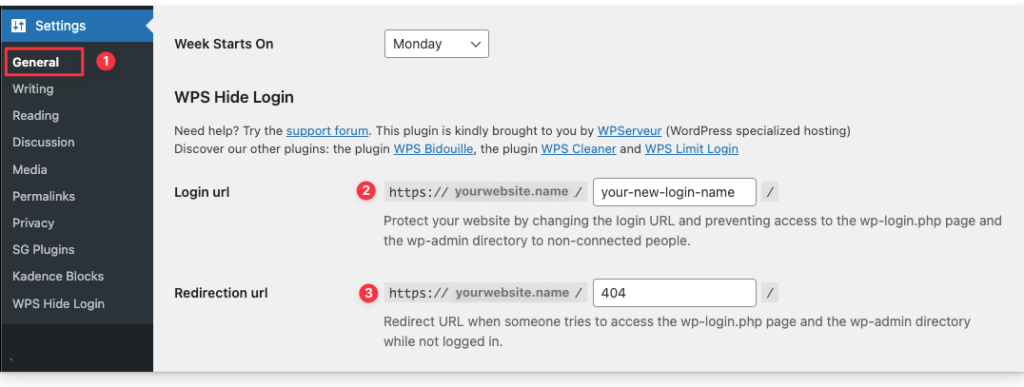
- Next, navigate to the Settings > General section of the WordPress dashboard. Scroll to the bottom of the page until you see a section called “WPS Hide Login.”
- This is the step where you can configure your login URL. Type in the custom WordPress login URL in the text field to the right of your website domain. In this example, we updated the custom login URL to:
https://yourwebsite.name/your-new-login-name- This step is optional, but you can also redirect visitors who attempt to visit the default WordPress login by specifying the URL in the Redirection URL text field.
Click “Save Changes” to enable the new custom login URL.
Next, test your default WordPress login URL to ensure it is not reachable. In the browser, type in your default login URL. For example:
yourwebsitename.com/wp-adminThis test URL should take you to a 404 page or the redirection URL if you added one during the configuration step above.
Finally, test the new custom WordPress login URL that you created with the plugin to ensure you reach the new login URL.
The next method does not require a plugin, but we recommend having familiarity with the host file system.
Changing your login URL without a plugin
If you prefer keeping your WordPress website lean with fewer plugins, this might be the right method for you.
Before starting, we highly recommend that you make a backup of your existing website. Editing core WordPress files can quickly render your website unusable. You want to make sure there is at least one form of backup.
There are four main steps to completing this method:
- Download a copy of the wp-login.php file
- Edit the duplicate wp-login.php file
- Create a Child Theme
- Add a code snippet to the Child Theme’s functions.php file
Understanding the WordPress file system
Similar to a Windows-based folder structure, WordPress has its own folder and file structure. Most websites are now using shared or managed hosting options so, to modify these files, you will typically need to log into your host account.
Depending on your host, the screens in the instructions below will vary, but the steps will be the same on most major hosting platforms.
If you are working offline on a workstation, the same steps apply. However, your files will be on your local drive instead of the host cloud servers.
Let’s begin.
1. Download a copy of the wp-login.php file
The wp-login.php file is responsible for directing visitors to the correct login page when they type in the default WordPress login URL. A backup of this copy is recommended before modifying the login URL.
With traditional shared hosting, navigate to the File Manager for your host. With EasyWP managed hosting, there is no File Manager. However, you can still access the files and folders for your website via SFTP. Each host will have their own unique way of finding the File Manager. To find your host-specific instructions, you can google “File Manager for [Your Host Name].”
Once you find the File Manager, navigate to the public_html folder.
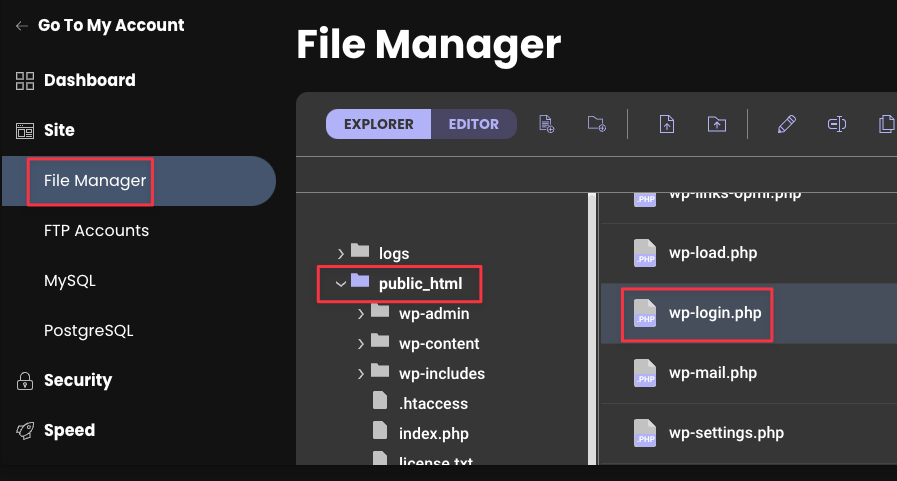
Find the wp-login.php file. Download the file locally so you have a copy of it.
You can usually download by right-clicking on the file and selecting the Download option or using the menu buttons at the top of the File Manager screen.
Next, with the offline copy, make a duplicate copy of the wp-login.php file. Store the original in a backup folder. We will modify this duplicated version in the next section.
2. Edit the duplicate wp-login.php file
Find the duplicated wp-login.php file on your desktop and open it in any text editor that has the find and replace feature.
In the text editor, find wp-login.php and replace all instances with the new login URL you would like to use.
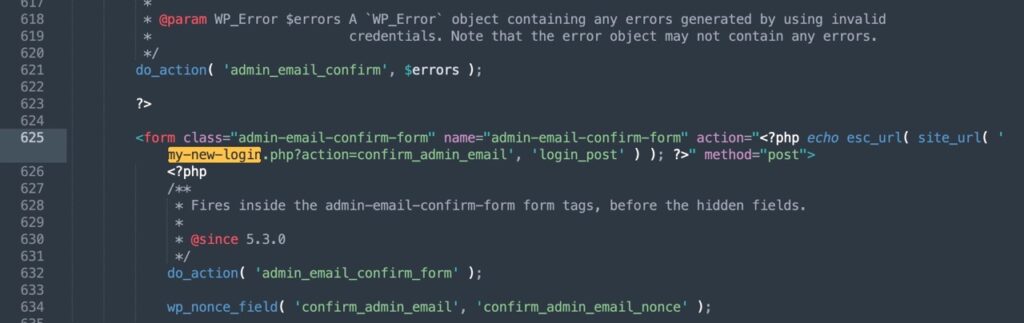
For example, find all instances of wp-login.php and replace it with my-new-login.php, which would be your new custom URL.
Save the changes and rename the file to match your new URL (e.g., my-new-login.php) to easily identify it later. This step is not a requirement for it to work, but recommended.
When using EasyWP managed WordPress, renaming the wp-login.php file affects both the EasyWP Dashboard functionality and the default WordPress functionality a bit. These functionality disruptions are not critical but may require advanced knowledge of WordPress to resolve. If you are relatively new to these types of advanced changes in WordPress, please consult our help center or contact customer service before you begin the renaming process.
Next, if you are using shared hosting or a dedicated server, navigate back to the host File Manager and upload this new file to the public_html folder.
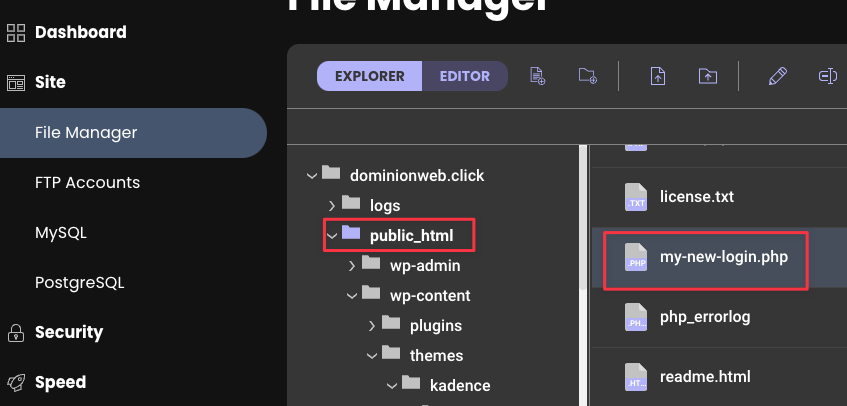
At this point, you should have the new custom file and the original wp-login.php file in the same folder. You can now delete the wp-login.php file from the File Manager as there was a backup created in the previous step.
Remember that with managed WordPress from EasyWP, there is no public_html folder. When connecting via SFTP, you will need to access the home folder directly, and see the list of WordPress folders and files right away after establishing the connection.
Only your custom login file should be in this folder. Next, we will create a child theme.
3. Creating a child theme
Since we are modifying core WordPress files, when we create a child theme, it will keep the changes enabled on the site in case your WordPress version updates.
If you do not create a child theme, you can still manually update the login URL, but you will have to redo the steps with each WordPress update which can be a pain, so we do recommend using a child theme.
First, check if your current theme already has a child theme available. If it does, activate it in the WordPress Dashboard and move to step 4 of the instructions below.
If a child theme is not available, then we recommend creating a child theme from scratch or you can download their sample and modify the code.
If you downloaded the “Example Kadence Child Theme” option from the link above, you should have three files:
- functions.php
- screenshot.png
- style.css
Next, we need to add custom code to the child version of the functions.php file so that you can log out and reset the password properly with the new login URL.
4. Add a code snippet to the child theme’s functions.php file
One of the issues with changing the default login URL is that it breaks the lost password and logout flows. We can fix this by adding custom code which is referred to as a filter hook.
On your desktop, open the child theme folder and find the functions.php file.
Open the file in the text editor and add the following code.
<?php
/**
 * Enqueue child styles.
 */
function child_enqueue_styles() {
	wp_enqueue_style( 'child-theme', get_stylesheet_directory_uri() . '/style.css', array(), 100 );
}

// add_action( 'wp_enqueue_scripts', 'child_enqueue_styles' ); // Remove the // from the beginning of this line if you want the child theme style.css file to load on the front end of your site.

add_filter( 'logout_url', 'my_logout_page', 10, 2 );
function my_logout_page( $logout_url) {
    return home_url( '/my-new-login.php');
}

add_filter( 'lostpassword_url', 'my_lost_password_page', 10, 2 );
function my_lost_password_page( $lostpassword_url ) {
    return home_url( '/my-new-login.php?action=lostpassword');
}
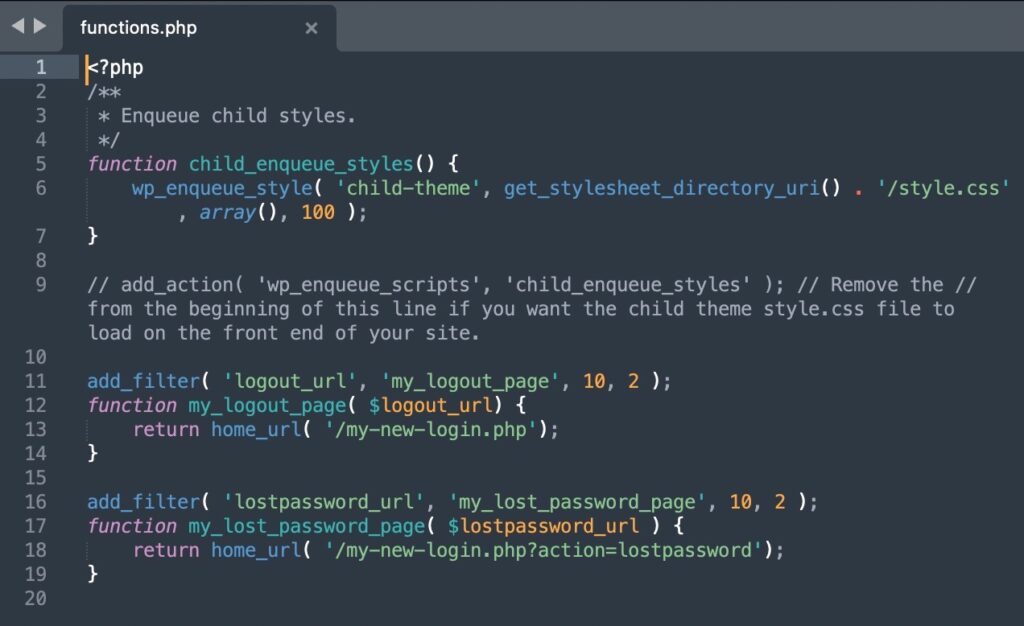
Replace the lines in the code that says “my-new-login” with your specific custom URL. Save the changes.
When finished, your code should look similar to the image below. Your functions.php file may have a different number of lines which is typical if you have a different child theme.
Next, go back to the File Manager, and navigate back to public_html > wp-content > themes > [your theme name].
Upload the entire child theme folder. If your theme already has a child theme, then you just need to make the code modifications from above and can skip this upload step.
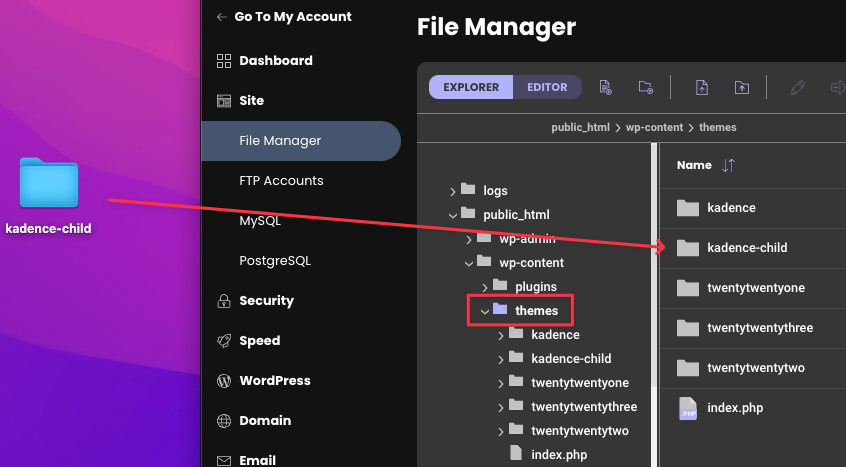
There should now be your original theme (e.g., kadence) and the child theme (kadence-child) folders in the Themes folder.
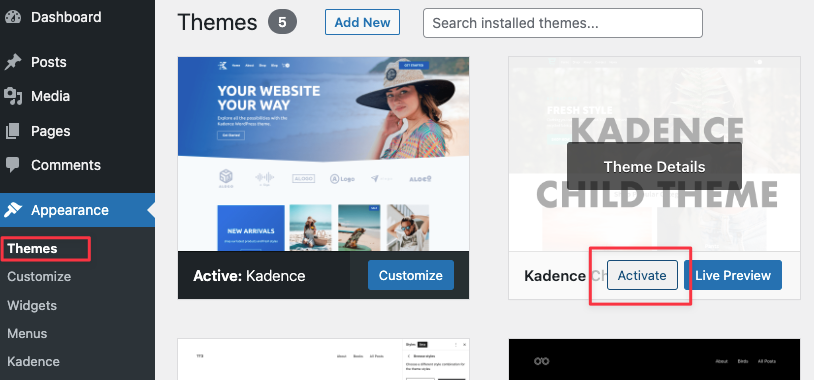
Next, go to your new custom login URL (e.g., yourwebsite.com/my-new-login.php) and log into your WordPress Dashboard.
Navigate to Appearance > Themes
Activate the child theme.
Finally, test that the function.php filter hook code worked by logging out of WordPress. You’ll know the steps worked if you are redirected to your new custom URL login page and not the following URLs:
yourwebsite.com/wp-admin
yourwebsite.com/wp-login.php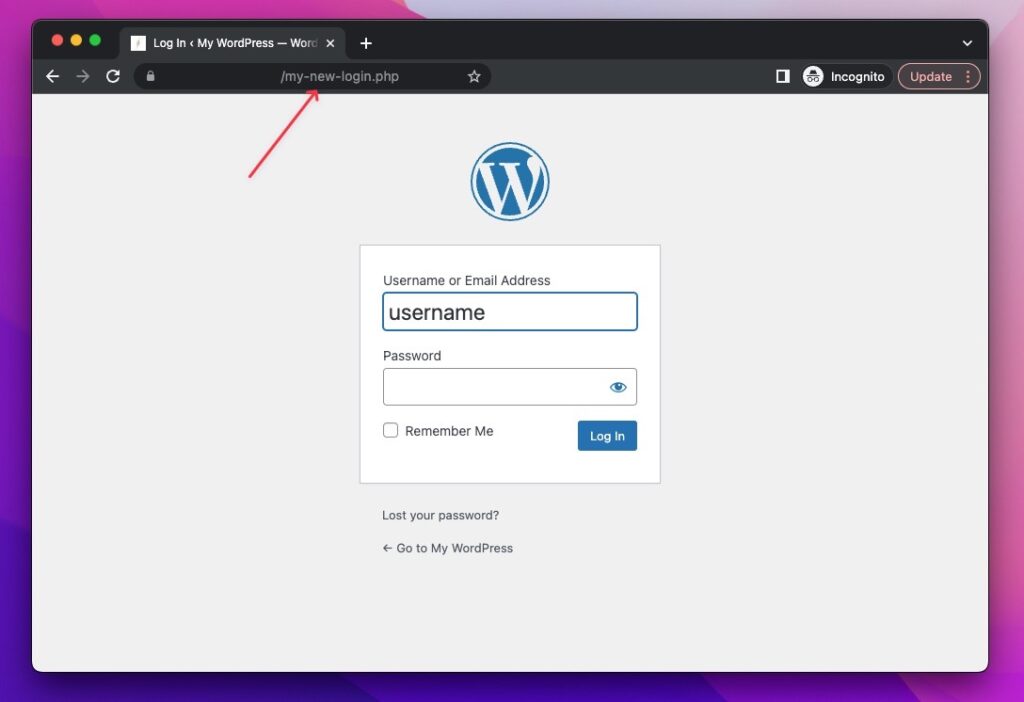
You’ve now successfully updated your custom WordPress login URL. In the next section, we’ll provide some actionable steps to securing your WordPress website even more.
Securing your WordPress website
When it comes to security, it’s about establishing a balance between convenience and peace of mind. Before you lock down your entire WordPress installation, take into account why you are securing the data.
If your website is a personal hobby blog, you can probably add a strong password and call it a day. If your entire livelihood is on the website, then you will want additional layers of security.
Here are three actionable steps you can implement today to increase your WordPress security.
1. Use strong login credentials
It sounds simple, but a surprising number of website owners still use unsecured passwords. We recommend a mix of 14–16 upper and lower case characters (including special characters).
For easy password retrieval, try using a password manager to keep it all organized.
Be sure to also change the critical passwords periodically in case your credentials are part of any successful data breaches by services that were compromised.
2. Keep WordPress installations, plugins, and themes up to date
Developers are always fixing vulnerabilities in their software. Be sure to apply these updates regularly in the Themes, Plugins, and Appearance menu items of the WordPress Dashboard.
If you have a plugin that you suspect will break the user experience after an update, make a backup of your website before the update. Do a quick check after the update to ensure everything looks correct.
You’ll have peace of mind knowing a backup is available.
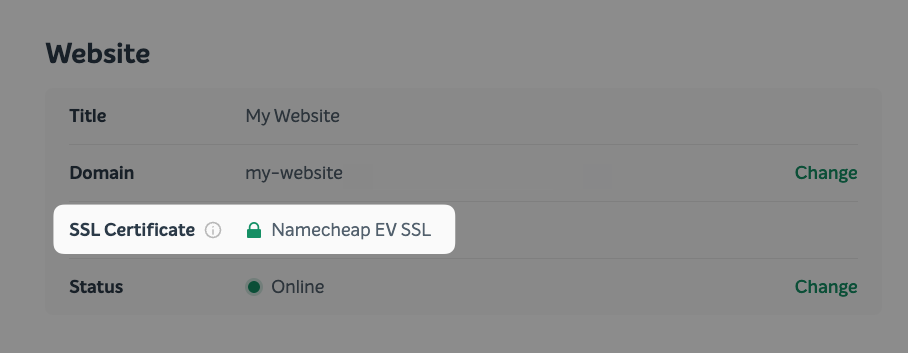
3. Apply your host’s SSL certificate
Platforms like EasyWP make it easy to get started with security. By default with free subdomains, the SSL Certificate is already installed.
If you are hosted on other platforms, check their knowledge base articles or customer service to find instructions on how to enable the SSL Certificate.
Our EasyWP Turbo and Supersonic packages include a free SSL certificate for custom domains. These free certificates must be activated manually. The activation is pretty simple, so check out our instructions on how to activate a free SSL certificate provided with Turbo and Supersonic.
This simple step will show proof of authentication for the website’s identity and provide an encrypted connection. This is particularly important if you are asking customers to input sensitive data like credit card information.
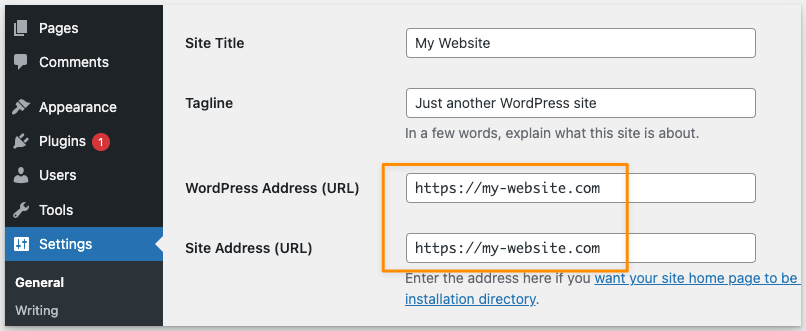
Update the WordPress and Site Address URLs to HTTPS versions. Some hosts will default these two settings to the HTTP version even if you have an SSL certificate enabled.
Frequently asked questions
What happens if I change my theme after I create a custom login URL?
If you used the plugin method, changing themes should not conflict with the custom login URL.
If you changed your custom login URL manually through code, you will have to update the functions.php file again with the new theme.
Just make sure to create a new child theme and upload it to the File Manager outlined in step 3 above.
What happens if I encounter an error message updating the code?
If you encounter an error message and cannot debug it, we recommend deleting the child theme and the custom login URL file you created. Then upload the backup files, and try again.
If you’re developing on your local workstation, the latest version of WordPress and past versions of WordPress can be useful if your backup copies are unavailable or corrupt.
For managed hosting options, like EasyWP, we recommend contacting customer support as they can further assist you.
As an alternative, you can also consider using the plugin method detailed in this article.
My website is not accessible anymore, what should I do?
If your website no longer functions, we recommend deleting the child theme and the custom login URL file you created and uploading the backup versions to try again.
If that doesn’t work, find and restore the backup for the entire website. Most hosting services will also have a backup of your website if you forget to back it up.

Contributor: David Lin
David Lin is a seasoned growth marketer and project manager. Before starting his blog at hellodavelin.com, he produced AAA titles at EA, Activation, and Microsoft. He currently provides SEO consulting for SaaS brands.
More articles from us!
How to test a WordPress plugin before installation
Navigating the dynamic world of WordPress and AI
