How to test a WordPress plugin before installation


As a WordPress user, you will understand the power of plugins in enhancing your website’s functionality. Plugins remove the need for you to have coding knowledge and can transform a static site into an e-commerce store, a media house, an e-learning platform, or something else.
There are thousands of plugins available. However, you should always test them before installing, which can save you from potential compatibility issues, conflicts with existing plugins or themes, and unexpected errors.
Here, we’ll walk through the steps necessary to effectively test a WordPress plugin before installing it. Follow these best practices to ensure that your chosen plugin aligns with your website’s needs and functions seamlessly.

Steps to take before you test
This is the ‘pre-test’ stage so you can do some preliminary research and checks before you even have to actively test a WordPress plugin.
- Research and read plugin reviews
Your first step will likely be to find a plugin that meets your needs. You should visit the official WordPress plugin repository or reliable marketplaces like CodeCanyon to find plugins that align with your requirements. During this process, shortlist some options and do your due diligence. Here’s how:
- Scan through the list of plugins and read user reviews and ratings.
- Look for reviews on the WordPress.org forum and other forums or websites where users discuss plugins.
- Check the star rating and read comments from other users to get an idea of the overall satisfaction level.
When researching a plugin, pay close attention to positive and negative feedback. Mainly look for insights like the number of active installations and how frequently the plugin is updated.

Evaluate plugins based on reviews, star ratings, and discussions.
Plugins with high ratings, positive reviews, and regular updates are generally more reliable and effective. However, don’t forget that every website’s needs are unique, so choose a plugin that aligns with your specific requirements.
- Check compatibility and updates
Not all plugins are compatible with your WordPress version or other plugins and themes you use. So, it’s essential to check a plugin’s compatibility before installation.
- Check the “Compatible up to or with” section on the plugin listing in the repository to see if it matches your WordPress version.
- Check its compatibility and system requirements on the plugin’s page in the WordPress repository.
- Look for known conflicts with other plugins or themes mentioned in the plugin description or changelog section.
- Check the ‘Last Updated’ date to see if the developer regularly maintains and updates the plugin. Frequent updates indicate that the developers are actively improving the plugin’s features, fixing bugs, and addressing security vulnerabilities.
- If possible, also check if it has been tested with your current WordPress theme.
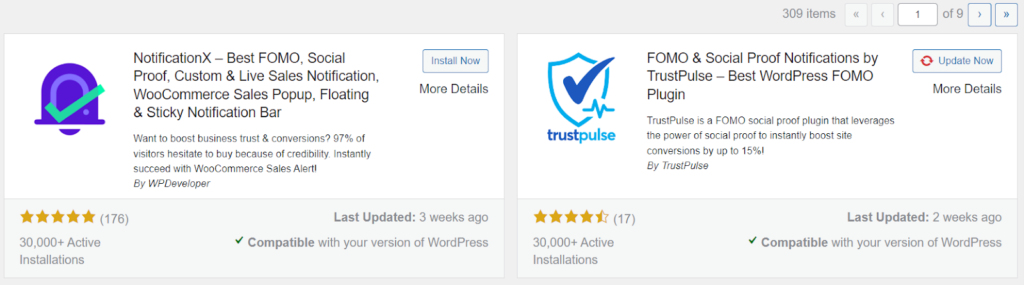
Check for the latest updates and compatibility.
Compatibility matters the most when it comes to plugins related to security, SEO, caching, and other core functionalities. To avoid any major issues, you want to make sure the plugin you choose is compatible with your website’s current setup.
How to test plugins before installation
Finding out about the plugin’s compatibility, security, and reliability can give you an understanding of its effectiveness. And once you’re sure about which plugin to install, it’s time for testing. Here are the steps to test a WordPress plugin before installation.
1. Backup your website
Before you begin testing a new plugin, it is essential to create a backup of your website. This step is a safety net in case anything goes wrong during the testing process.
There are a few options for backing up your site:
- Download and activate a backup plugin to create a copy of your website.
- Check out your web hosting control panel or refer to your hosting services to make a backup via your hosting dashboard. A good web hosting provides frequent backups automatically to ensure the latest version of your site exists.
- You can manually back up your website.
Backing up your site means you’ll have a fallback should a plugin cause issues with your content.
2. Set up a staging site
Avoid using your live website for testing as it will affect the user experience and can lead to unforeseen issues. The best way to test a plugin is by creating a staging site that’s an exact copy of your live website in terms of functionality, design, and content. A staging site is not visible to the public and you can use WordPress maintenance mode without affecting your live site.
You can create a staging site manually or by using a plugin like Duplicator.. If you have the skills, manually create a subdomain and install WordPress to apply and test your plugin.
3. Install and test the plugin on your staging site
Once you’ve created a staging site, install the plugin you want to test. You can do this manually by uploading the plugin’s zip file via FTP or through the WordPress dashboard. Activate it and start working with your plugin to see how it impacts your website.

A compatible and good-quality plugin should add new functionalities to your site without changing its appearance. You’ll know that it’s working fine when everything looks like it should.
Let’s look at key checks to run to ensure your plugin is optimized across the board:
- Run your staging site on various web browsers such as Chrome, Firefox, Safari, and Edge and look for obvious UX and UI issues.
- Check for slow loading speeds,possibly caused by the plugin.
- Activate all other plugins and your current theme on the staging site to assess potential conflicts with other plugins/themes.
- Perform all the functions and tasks that the plugin is supposed to do. For example, if it’s a contact form plugin, fill out and submit a test form, or if it’s an auto-posting and scheduling plugin, connect accounts and schedule some test posts.
- Try different settings and options available in the plugin to see how they affect your website.
- Keep visiting the live preview of your site to ensure that everything is working as it should.
Useful testing is all about noticing the details. It shouldn’t be challenging but it will take time and effort to support the effective working of a plugin before installation.
4. Debug issues
If you encounter issues or errors during testing, debugging is essential to identify the root cause.
This doesn’t have to be a complex process. Here are some simplified steps you can follow:
- Use WordPress’s built-in health check: WordPress offers a Health Check & Troubleshooting plugin that can help identify common issues without needing deep technical knowledge. It allows you to check your website’s health status and provides simple solutions or recommendations.
- Check for plugin conflicts: Sometimes, the problem isn’t the plugin itself but how it interacts with other plugins or themes. You can do this by deactivating all other plugins except the one you’re testing. If the issue is resolved, reactivate the other plugins one by one until you find the culprit.
- Switch to a default theme: Themes can also cause conflicts. Temporarily switching to a default WordPress theme, like Twenty Twenty-One, can help you identify if the issue is theme-related.
- Use the ‘Enable Debug Mode’ option: In your `wp-config.php` file, you can enable WordPress’s debug mode by setting `define( ‘WP_DEBUG’, true );`. This feature shows a more detailed error message which can be helpful when seeking help online. Remember to turn it off (set it to `false`) when you’re done to avoid displaying errors to your visitors.
And finally, ask for support from online WordPress forums — they often have all the information you need.
5. Gather user feedback
Another valuable step in testing a WordPress plugin is gathering feedback from a group of trusted users or team members. Their input can offer useful perspectives on a plugin’s performance and functionality.

Simply ask a customer or an employee to use your website as usual and note any feedback. This way, you can gauge the real-world usability and potential issues that may not have been apparent during the above testing phases.
Alternatives to testing plugins yourself
Let’s say you’d rather not create a staging site or undertake any steps that seem too complex and technical. No worries, there are alternative ways to test plugins before installation.
Explore demo versions or free trials
You can look for demo versions or free trials. Most reputable plugin providers offer demos or trial versions of their plugins to users. This is an excellent opportunity to experience the plugin’s features firsthand and determine if it meets your expectations.
Take advantage of these options by exploring all the functionalities, settings, and customization options. Pay attention to the user interface, ease of use, and how well the plugin integrates with your existing website.
Testing a demo version or free trial allows you to evaluate the plugin’s compatibility, usability, and potential impact on your website’s performance. If a plugin doesn’t offer a demo or free trial, consider reaching out to the developer directly to inquire about any testing options they may provide.
Online testing tools
You can use online testing tools which provide a virtual environment for testing WordPress themes and plugins. These platforms don’t need any technical knowledge to run tests and will simulate what using a plugin is really like.
However, keep in mind that these online tools may not always provide accurate results, and it’s best to combine them with other testing methods mentioned above for a more comprehensive evaluation of the plugin’s performance.
Add plugins to your WordPress site successfully
There’s no one-size-fits-all solution when it comes to plugins. What works for an internet guru or your best-friend’s site may not be right for you. It’s essential to research and test different options before making a decision that suits your website’s needs. By following the steps mentioned above, you can make an informed choice and select the best plugin for your WordPress site. Remember to always prioritize compatibility, security, and reliability when choosing a plugin. And the best way to do this is to use EasyWP for hosting and backup your site easily.
FAQ: Testing WordPress plugin safely
Yes, testing first is a smart habit, because an incompatible or poorly coded plugin can break layouts, introduce errors, or slow your pages without warning. Testing doesn’t take too long. Once you’ve got a plugin installed and the settings configured, perform one simple test function, then go to your live site. See if the plugin did what it was supposed to do, and if everything looks good, move on. If something looks off, try another plugin.
Review its star rating and confirm your WordPress version is supported. Then check the last update date, and look at how many active installs it has. You want to make sure the developers are still active and that other users trust that plugin. When the plugin has at least a few dozen installs and a handful of positive reviews, it’s most likely safe to install. Just keep in mind that if it’s a relatively new plugin, released within the last few months, you need to take extra care to keep it updated as the developers roll out bug fixes and performance updates. We recommend turning on EasyWP’s auto update feature for this reason.
WordPress Playground is a free online testing environment developed by the core team, which makes it easy to test any plugin. You can also publish a secret test page on your WordPress site, and leave it unlinked in your site navigation. Make the page private on the back end, and this gives you a place to test block and widget plugins. For plugins that make changes sitewide, create a staging version of your EasyWP site, install and configure the new plugin there, click through key pages, and only install it on your live site once everything looks stable.
More articles from us!
